Category Archives: Bags

A New Wallet

Mum had asked for me to buy her a new wallet for her birthday; it had to match the look of her old wallet, complete with a zipped pocket, and velcro closure, but that was easier said than done, as nowhere seems to stock a wallet that style now!

So instead, I decided to be reckless and have a go at making my own from scratch. After a rummage through my fabric scraps bag, I came across some suitable fabric, a zip I’d unpicked from a failed bag attempt, a small amount of velcro that Mum had let me have, and some bias binding that I think was originally earmarked for binding the seams on a bag.

With some measurements taken from the original wallet, and a little planning on paper to ensure I was able to put the zip in without too much trouble, I ended up with a passable wallet that looks almost the same in style as the original! The original wallet did use a more sporty fabric than the polycotton I’ve used, but this way Mum can have a unique wallet rather than something mass produced that everyone else might also have.

The only disadvantage of making Mum a wallet, is that now she has plans for a wallet for every season! But at least it means I’ve already got an idea what I can make her for Christmas.


Notebook Folder the Third

In the run up to my Mum’s birthday, I was trying to think of something I could make as a present. I’m not confident enough to make clothing for her, and she didn’t need a new bag – so what could I possibly make her? I did notice, however, that she was using a reporter’s notebook, which gave me the idea of a new notebook folder for her. The original one I made was on Mum’s sewing machine, and proved a struggle to sew through all the layers of fabric. The second one was easier, although I still used non fusible wadding, so I had to quilt the inside cover.

This time, I was determined to follow the pattern (almost) exactly! I used two fat quarters, a small amount of dress lining fabric, and some fusible fleece, so there was no need to quilt the inside cover.

I ensured the button and strap were the right way around this time, as the first attempt had the strap on the inside of the cover, with the seam allowance sticking out… rookie mistake!

I left out the pen and card holders, as Mum prefers to keep her pen separate to the folder, in case the pen leaks.

I cheated on the inside of the notepad pocket, as it seemed a waste to use a fat quarter when you weren’t going to see the pattern. So I used some cream dress lining fabric instead.

The angled pocket was slightly wider than the fabric I had left over, hence the small piece of the second fat quarter in the right corner. But rather than that looking like a mistake, I think it just adds to the quirky appeal of the folder.


Pattern: Notebook Folder Tutorial from Riley Blake Designs
Fat quarters: Hobbycraft


Sunday My Way bag

The last couple of messenger bags I’ve made haven’t quite gone to plan – either the lining hasn’t co-operated as I’d hoped, or the pockets aren’t quite the right size. Either way, I decided it was time to try making a different bag completely. So, I thought I’d use some of the polka dot canvas I had in a remnant pack from Abakhan, and some burgundy polycotton I had left over from the previous messenger bag, to make the Sunday My Way bag.

bag-back

It’s a completely different style to the others I’ve tried making, with a slip pocket on the front, a long zip with tabs on either end, and straps that look like they go all the way around the bag, but don’t actually cross the bottom piece.

bag-front

If I made another one of these, I would probably change a couple of the methods – topstitching the strap over the existing topstitching was almost impossible to get it accurate. For my own bag, that’s not something I’m too concerned about, but if I was making one for someone else then I’d want it to look neater than that!

bag-top

The lining is inserted in a different way to any other bag I’ve made before, attaching it to the seams of the main bag body. That went reasonably well (other than the lining already being puckered where I couldn’t get the seams to lie totally flat), but sewing the lining to the zip seam was a real challenge. Again, you have to top stitch over the existing stitch lines…. as I did that, the lining shifted slightly so some of my stitching didn’t catch the lining at all. In the end, I hand stitched the lining to the zip, which gave it a neater look.

bag-open

I didn’t add any interior pockets to this one – I decided it’d be a useful shopping bag to hold any purchases, rather than needing pockets for a phone and a wallet!

My first attempt at “Design Your Own Handbag”

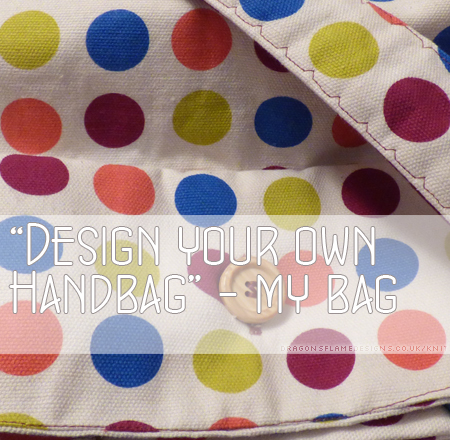
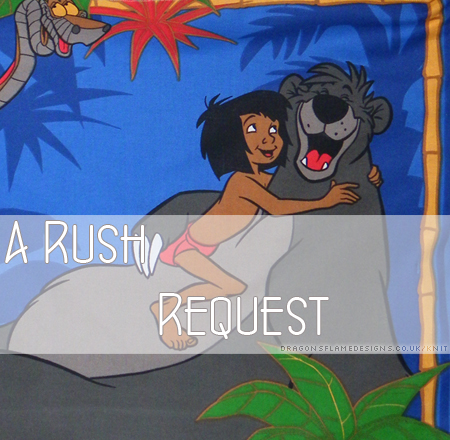
Having had enough of the problems with the other messenger bags I’ve tried making, I decided to “invest” in a Craftsy Course called Design Your Own Handbag. Promising to tell me how to make several different pockets styles and zipped closures, I felt it was worth the money as it should prove useful for many different bags.

I will admit I didn’t find this course as easy to follow as the Fleece Sewing one I’ve started – yes there’s a lot of information, but as the bag design is up to each individual, there’s a lot of things that I feel could be explained a bit better.

Lining the outer pocket up was a bit hit and miss – mainly miss, as I had to unpick the entire thing and resew it. The inclusion of an interlining (I used some thick cotton I found in a local fabric shop) meant that it was a bit too thick to get my hand sewing needle through to tack everything, so I had to make do with pins…. which wasn’t ideal.

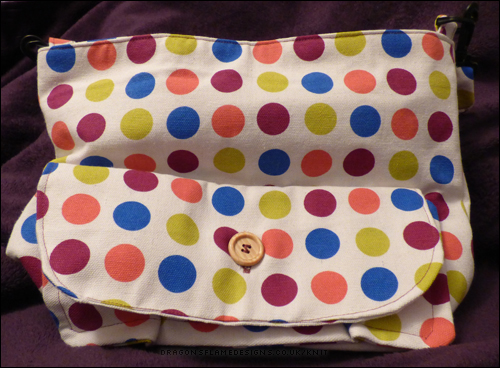
However, the second time around, I did get the pocket to line up – and the button I’d already machine stitched onto the pocket, also lined up with the buttonhole!

handbag-4

Just to prove the button does do up….

handbag-3

Adding the back zipped pocket was also a challenge – after stitching and unpicking it, I decided to make it more like a welt pocket, so you couldn’t see the zip tape. That gave a nicer finish, although if I made another, I would also add an extra inch to the width of the pocket pieces – that would enable me to sew it neatly around, without the risk of catching the zip tape on the sides.

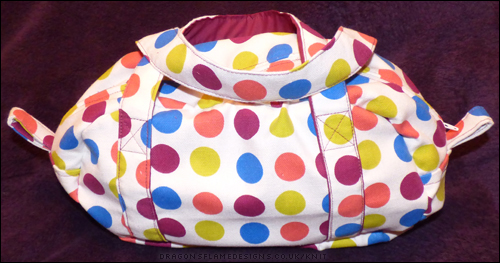
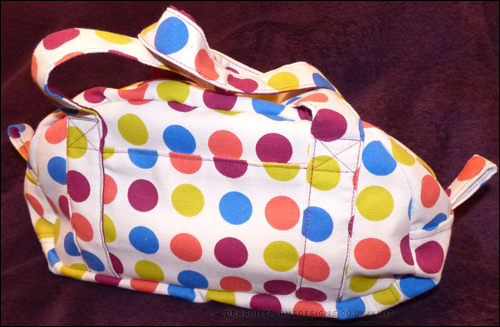
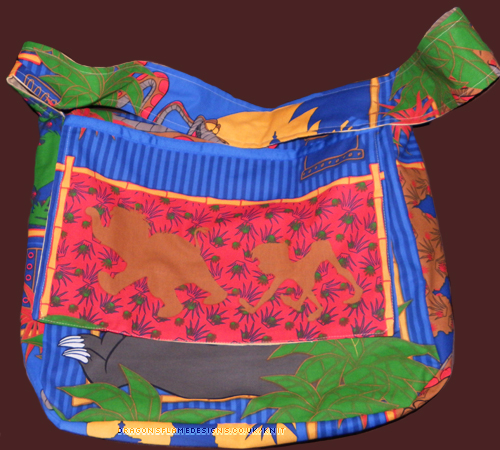
The rest of the bag outer was pretty self explanatory – much like the Good to Go messenger bag, you cut the corners from the main pieces in order to get the depth of the bag. My canvas was a bit too fray-happy at times, resulting in some extra stitches being necessary, so I did zigzag the edges of some pieces just to be on the safe side.

Due to the fraying, I had to ignore where it’s said to trim the edges really close to the stitching, but while that made some of the seams a little more bulky, it didn’t really change the look of the finished bag.

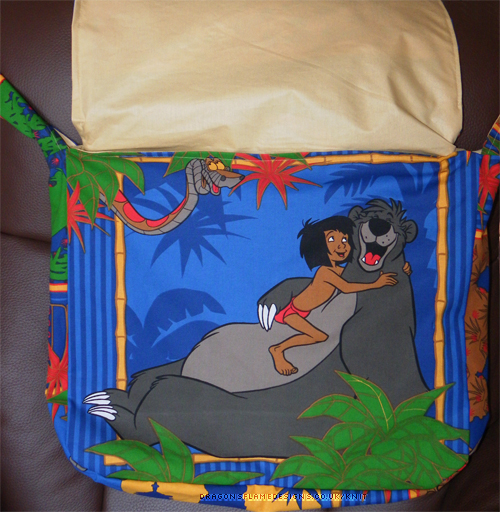
I added a couple of patch pockets to the inside, like I did on the previous bags, but other than that, the lining pieces were just the basic pattern ones.

handbag-1

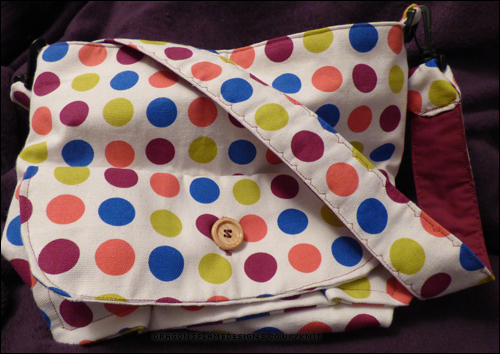
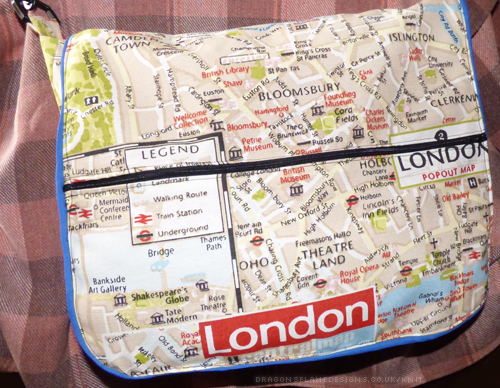
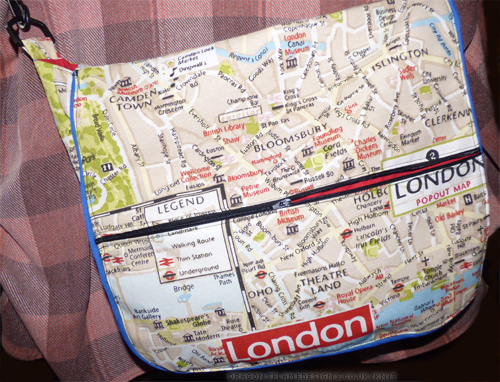
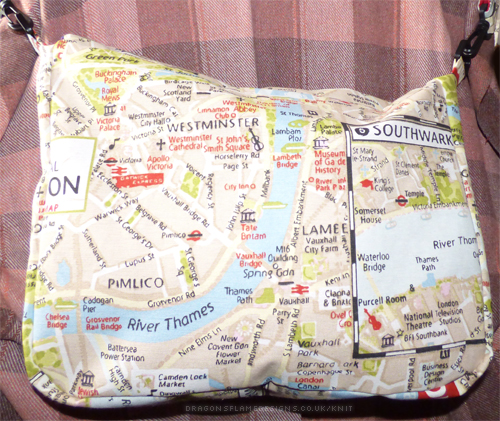
I decided to add some tabs on the sides to hold a strap, rather than adding a tab to the front and back – I prefer a cross-body strap. Top stitching the strap was done with a decorative stitch, just to make it look a little different to the regular boring straight stitch. The tabs and strap were made almost identically to my London Tourist bag.

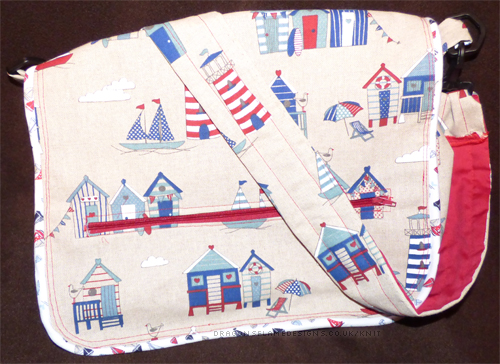
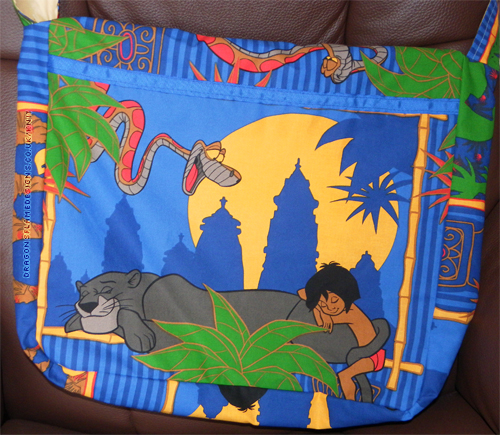
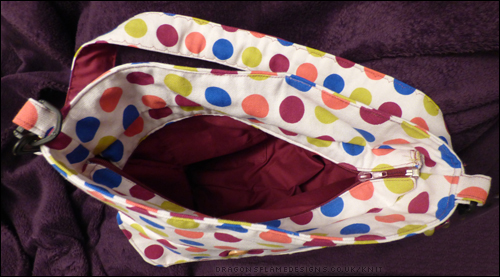
Now we come to the main reason for me wanting to take this Craftsy course – the top zip. None of the other bags I’ve made have had a closure to the main body, so this was an important thing for me to want to learn. After all, even if you have a flapped messenger bag, a strong wind can make the flap flip up, so it’s nice to have a secure way of closing it.

handbag-5

I struggled to get the top piece to line up to the zip – it’s the first time I’ve used an open (separating) zip, so I didn’t realise the metal at the end took up so much space. Partly because of the fraying canvas, and partly due to not cutting a little extra on the flaps, I didn’t have space to turn the flap pieces right-side-out and keep the metal part of the zip on the outside. So that side had to be zigzagged together – not an ideal finish.

However, using some double-sided fusible tape to ‘baste’ the zip in place seemed to work really well for that – much better than the back zip pocket (too many layers for the heat fro the iron to go through). And the zip is perfectly usable and relatively neatly stitched as well!

Rather than leaving a hole in the base of the lining to turn it all right-side-out (I really like my lining to be strong, and I didn’t feel that a hand sewn seam would have the strength I was after, I left a gap at the top, where the facing and outer join – that was able to be closed with the final top stitching, so you wouldn’t know there’d been a gap there 🙂

handbag-2

The only other thing I wish the course had pointed out, was that the angle of the top zip means that it needs to be pushed down into the bag to run smoothly – this means you can’t put anything in the bag that would be 1″ or less from the zipper flaps…. which means my entire bag really could’ve done with being an extra inch tall to compensate *sigh*

I would try making another bag from this course, mainly because now I know the ‘quirks’ of the methods, I should be able to rework it and make a bag with the [erfect (or near enough) dimensions!


Polka dot fabric from Abakhan (part of a ‘canvas remnant pack’), polycotton lining, cotton interlining and and accessories from a couple of local shops.

Beach Hut Messenger Bag

You can never have too many bags…. or at least you can never make too many bags! I’ve not been 100% certain about the way the lining looks caught up on the messenger bags I’ve previously made, so I decided to try out a new pattern. The Good-to-go messenger bag by Two Pretty Poppets, has a plain body with a patterned flap…. but I wanted to change that slightly, so I used their pattern, but with patterned fabric on the outside, and a plain lining.

I also added in a zipped pocket on the flap, piping around the flap (it’s not clear in the photo, but that’s white bias binding with sailboats on, to fit the beach theme), and added some plastic bag clips to hold the strap in place – not only does that make the strap removable if needed, but it also adds a nice touch to the finished bag.

Beach Hut Bag

Because of the way the bag is sewn together, the lining isn’t stretched around strange corners, and there’s no weird puckers and stretches on the inside. I also changed the inside pockets, to fit a small bottle of water and a smart phone, to save rummaging around amongst everything else just to find the phone when it rings.

Beach Hut Bag

I would probably make the bag slightly taller if I made another, and maybe also add in the clasp to close it (I left that out, as I wasn’t too sure how accurately I could attach it!), but I think it’s a very good pattern, and it’s also a lot easier to sew than the previous one I tried!

Simplicity 1556

The trouble with buying bubble bars from Lush, is that they come in a paper bag. Great for the environment, but what do you store it in to stop all the pieces going everywhere? I’ve found some small plastic food containers in Poundland that work pretty well, but then you get a pile of them in the wardrobe, which invariably falls over whenever you want to find something.

So, I decided to make Simplicity 1556 for my Mum’s Christmas present – a drawstring bag with pouches around the outside. There’s no dimensions given on the pattern envelope, but going on the fabric requirements, I hoped it would be large enough to work.

basket1

Armed with my red and orange outer fabric, and some nicely patterned orange lining fabric, my first problem was with the usual “fusible fleece”. Not having any of that to hand (and realising that if I bought it from the only shop I found it for sale, it’s cost more than the fabric did), I decided to use 2oz polyester wadding instead. I quilted that to the base and bag linings, so you can’t see the stitching on the outside.

asket2

Attaching the pouch strip was challenging, and some of the pouches are a different width to the others, but it fits the items I want to put in there. I will also admit I messed up the drawstrings, sewing the wrong ends together, but it still draws closed so I’m not going to unpick that!

I wanted to give her a pack of bath bombs from Slimbridge Soaps, but the packet of 4 wouldn’t fit into the pouch, so I made some small sewn bags to put them in individually – that way I can get one item per pouch, so it’ll fill them up 🙂

basket-pouches1

Lush didn’t stock her favourite bubble bar this year, but I did find an alternative – but what to put it in? I couldn’t just put it straight into the pouch, as they sometimes leave a greasy stain and that wouldn’t look good for a present. So I made a quick quilted pouch (quilting the lining again), which should mean the bubble bar can slide in, and hopefully not make a mess everywhere!

basket-pouch2


Basket fabric from Fashion Fabrics, Christmas fat quarters from John Lewis

It’s Christmas! ….well, almost

Ok, so it’s not quite Christmas yet, but I’ve been busy sewing gifts for people. Some of those people have already opened their presents, but others have been good and resisted the temptation….

I think this has to be the best fat quarter bag I’ve sewn yet! The sides came out really evenly, and the topstitching works brilliantly in red as a contrast to the green main fabric.

jam-bag-brown-bg

The tree ornament was made from felt, with some white ricrac for the icing on the arms and leg, two red buttons for the candy, and some white felt for the eyes. It’s the neatest hand sewing I’ve ever done on the mouth, and the whole thing is sewn around the outside, so there’s no turning involved!

jam-bag

I ended up making a few of the gingerbread men – a couple for presents, and also one for my tree. They just looked too good to just make one 🙂

London Tourist Bag

I thought it was time I made myself another messenger bag, and I’m sure that Amber read my mind, as she posted a tutorial for a messenger bag with a zipped pocket.

tourist-bag-front

I wanted the fabric to be different to my previous bag, and this London map fabric stood out in the shop. The lining is a red polycotton, with some blue polycotton and piping around the edge of the flap.

I deviated from the pattern, and added a lining to the front flap pocket, so it doesn’t have any visible raw edges (and fraying ends). The red works brilliantly in there as well, and the pocket edges are just caught into the flap seams, so the pocket is full sized.

tourist-bag-zip

Because a map is obviously directional fabric, I did have to add a seam at the top so that the back and flap could both be the right way up. It was worth the extra figuring out though, as if the map was upside-down, it just wouldn’t have looked right!

tourist-bag-back

I think if I make another one like this though, I would probably change the front zip pocket slightly, and not have the zip reaching the end seams. That would give it a neater finish, and would also lose some of the bulk in the seams at that point.

A Lush little bag….

When I go shopping for some bath products, I don’t want to just have them in my main bag – they’d make everything smell! I love the look of the new Butter Bear Canvas Bag from Lush but at £9.95, I decided that I was better off making a bag of my own – then I can almost guarantee nobody will have one quite like mine!

So, using some of the Jungle Book fabric I used for the messenger bag, and also some of the same cotton for the lining, I made up a Fat Quarter Bag using Amy’s pattern. I did change the dimensions a little, to work around the fabric pattern, and I also added in a French seam on the base (otherwise the back would be upside-down!

bag-front

Once I added in the gusset in the base, the bag ended up a perfect size to carry a pot of Dream Cream, one bubble bar and two Butterbears!

bag-back

And the best thing about it? It didn’t cost much for the fabric, as it uses just over a fat eighth of each, and it’s completely washable just in case anything spills in it!

A rush request

I heard from a relative that he was going to be a daddy 😀 ….only trouble is, he told me about 3 weeks from the due date, which didn’t give me much time to make something!

I’ve sewn a couple of messenger bags using the tutorial from Crazy Little Projects before, and knew I could make one in quite a short space of time….  and I’d found the perfect fabric in the sale at just one pound for a metre!

So here we have the Jungle Book Nappy Bag….

Jungle Book Bag (outer flap)

Jungle Book Bag (outer flap)

Jungle Book Bag (back)

Jungle Book Bag (back)

Jungle Book Bag (inner)

Jungle Book Bag (inner)

The panels are (almost) fussy-cut, so the characters lined up nicely. I still can’t get the lining to behave though; it always appears too small when I start, and way too big once I sew the final stitches.

But I couldn’t make something for the parents and not make something for the baby, could I? Using my favourite bear pattern, I knitted Cheshire the Cat-Bear in white and cream yarn which gives him a nice mottled effect. He’s meant to be a bear, but I think his face looks more cat like, so he’s a Cat-Bear 😉

Cheshire the Cat-Bear

Cheshire the Cat-Bear

He should be just the right size for little hands to grab!