Tag Archives: fleece

How to de-fluff your machine

When was the last time you cleaned your sewing machine? If it was after you were sewing with fluffy fabrics, then well done! But if you’ve been sewing with a lot of furry or fluffy fabrics and haven’t cleaned your machine out in a while (I admit I’m guilty of this!!), then maybe it’s about time you gave your sewing machine a little care and attention.

If your machine seems to be ‘growing’ fluff, then it’s definitely time you cleaned it!

My machine has a top-loading bobbin, and the instructions tell me to never add oil to the machine. Front-loading bobbin machines will have different ways of cleaning out the fluff that collects.

Before we get started, you’ll need:

  • The screwdriver that came with your machine (or a suitable short screwdriver)
  • The lint brush that came with your machine (or a similar suitable brush)
  • Two tissues (not essential, but I find them useful – a couple of small cloths would work equally well)
  • A lint-free cloth (again not essential, but it can come in handy)

Ready? Ok, first things first – we need to remove the bobbin cover. You can tell I’d not cleaned my machine for a while, by all the fluff on the right hand side.

Remove the bobbin (simple so far, eh?)

Now we need that screwdriver. Mine is more like a key than a screwdriver, but it’s small enough to fit into the awkward angle needed to undo that back left screw.

The screws are pretty small so I put the plate and screws on a tissue to the side of my sewing machine, to make sure they don’t get lost.

I knew my machine was in need of cleaning, but I hadn’t expected it to be quite this bad.

Using that small lint brush, carefully remove the fluff from the machine. I find the fluff sticks quite well to it, so I don’t need to brush it from side to side in order to collect up the fluff.

I use a tissue to wipe the fluff from the brush so I’m not just adding more to the inside of my machine.

Next, check how the bobbin holder is located (and if necessary, take a photo) – you need to align it correctly when you put it back in. If you get really stuck, your instruction manual will have a diagram showing how to line everything up, but realistically I know you’re not going to want to spend time looking for the instruction manual in the first place.

Lift out the bobbin holder.

And guess what? Yep there’s more fluff on the inside of there as well! This can be brushed, or wiped around with a dry cloth.

All that’s left now, is reassembly! Replace the bobbin holder, taking care to line it up correctly. Then wipe over the needle plate (I use the tissue I put the plate on earlier) and put it back in the slot, remembering to tighten the screws so the plate can’t wobble with the vibration as you’re sewing. Sometimes I find this small screwdriver fiddly to use, so you might find a small regular-shaped screwdriver works better for you.

Then simply replace the bobbin and bobbin cover.

Your machine will thank you, and should now be ready for hours more sewing!


Pin this post for later:

Celstial Plushies – part five

Ok, so this isn’t actually a plushie, but it was made for a friend’s plush bear so it still counts! I didn’t want to try resizing a standard hoodie pattern, so I used the Apostrophe Patterns MyFit Tee for the bodice. You can enter the measurements of whoever (or whatever plush / doll) you are making for, and the pattern is generated for you, with your chosen seam allowance!

That bodice would give a t-shirt or a sweater, but my friend wanted a hoodie for their bear. So, I printed off the hood from the 12 months Ellie & Mac Around the Block Hoodie at 75% and removed some of the height of the hood to fit the bear’s head.

Why not head over to Minerva to see all the details of this make!


* – affiliate link
Hoodie bodice pattern: Apostrophe Patterns MyFit Tee (https://apostrophepatterns.com/collections/customizable-patterns/products/myfit-tee) Hood from Ellie & Mac Around the Block Hoodie* age 12 months printed at 75% and edited for height.
Fabric: Celestial plush fleece from Minerva (provided as my Brand Ambassador project for this month)

Celestial Plushies – part four

Having made two bears and two penguins from ‘tried and tested’ patterns, I thought I’d dive in with a pattern I’d downloaded but never actually made before.

Choly Knight’s Owl Plush pattern is a relatively simple shape, but the main feature is the applique face pieces. I used some black felt I had lying in my sewing box for the pupils, but all the white detailing is the reverse side of the fleece.

Check out my latest post at Minerva for all the details!


Pattern: Choly Knight’s Owl Plush
Fabric: Celestial plush fleece from Minerva (provided as my Brand Ambassador project for this month)

Celestial Plushies – part three

Ok, my last penguin was a little bit of mess in places! But I didn’t want to leave it as a ‘failed’ make, so I decided to make a 150% sized penguin to prove that it is possible for me to make one properly from this fabric!

Enlarging the pattern worked perfectly, and my penguin actually came out almost how I expected it to. It does have a twist to the tail but I think that adds some quirky character, so I’m not too worried about that.

Head on over to Minerva to check out the full details of my make


Pattern: BeeZee Art Penguin Plushie
Fabric: Celestial plush fleece from Minerva (provided as my Brand Ambassador project for this month)


Celestial Plushies – part two

Following on from the two bears, I wanted to make another penguin from a pattern I’d used before. This one wasn’t so successful, and resulted in a lot of frayed tempers and arguments… never argue with a plushie penguin – somehow you will never manage to win!

Head on over to Minerva to check out the full details of my make


Pattern: BeeZee Art Penguin Plushie
Fabric: Celestial plush fleece from Minerva (provided as my Brand Ambassador project for this month)

Celestial Plushies – part one

I wanted to do something different for my latest Minerva Brand Ambassador project, so I decided to see how many things I could make from a metre of fleece. I started with two bears, using the white reverse of the fabric as a contrast for the ears.

Check out my latest post at Minerva for all the details!


Pattern: Simply Sewing Magazine, issue 24
Fabric: Celestial plush fleece from Minerva (provided as my Brand Ambassador project for this month)

Softshell Eden Jacket

Ok, I admit I’m not exactly sewing seasonal projects right now! But I have managed to get the Softshell Eden Jacket finished…. and my Mum has already claimed it for herself!

I wanted to make the topstitching quite noticeable, so I used some multicoloured Guttermann thread just to liven up the plain navy fabric. Unfortunately my sewing machine decided to skip stitches at times, so it’s not quite as evenly stitched as I’d hoped. I discovered on a later project that if I used a regular needle rather than a sharps needle, it actually sews an even stitch – just don’t ask me why!

I did purchase some poppers, but I haven’t yet tried adding them – Mum seemed quite happy with the jacket not having popped pocket flaps, and she never uses the poppers on her bought waterproof coat anyway.

The “alien” stage of turning the Eden jacket out – not the easiest of things to do with such thick fabric!

I’d never sewn a “proper” coat before, and certainly hadn’t even considered bagging out a lining… but it all went surprisingly smoothly, even down to the thread chain to finish it all off.

The finishing touch – a thread chain to hold the lining and outer fabric together under the arms (never done one of these before)

I couldn’t resist using a rainbow zip on the front of the jacket – the front placket does cover it, but it does give a flash of colour when you go to zip it up / unzip it.

And of course a colourful lining, to make up for the very understated plain dark blue outer.

All we need now, is some suitably cold weather so Mum can test it out!


Pattern: Eden Jacket by Tilly and the Buttons
Fabric: Navy softshell from Fashion Fabrics
Other supplies: Zip from Mibs

Ascent 2

I know it doesn’t seem overly seasonal, but with the great British Summer approaching, you never quite know what thickness of clothing you will need! In March we had snow, then a mini heatwave in April, before temperatures of 7C again! Besides, it’s nice to have a warm fleece to wear on a chilly late spring / early summer’s evening.

Following from my first Ascent fleece, I decided to change the facing a little, to make it easier to sew. I couldn’t find a suitably chunky zip this time, so I picked out a 10″ open zip instead and just covered the end with my facing.

I used bias binding for the facing – it dawned on me that a zip wouldn’t stretch sideways, so why did the facing need to be stretchy? The bias binding was a dream to sew in comparison to the jersey I used last time, and links in the white zips as well.

The pockets have regular zips again, but I stuck with white non-concealed zips to lift the navy blue fleece. Too much of a dark plain colour can look too heavy for the person this is made for, so I felt the white zips would lighten it enough for her.

The pockets are self-lined with the fleece, and while that’s not ideal for this time of year, it’ll be perfect for Autumn and Winter, with no risk of cold hands while she’s wearing this!

If you want to be really picky, the front section doesn’t quite seem to want to hang properly – it looks like it’s a little caught up near the base of the zip. But the relative I made this for was perfectly happy with it, and once it’s being worn you really wouldn’t notice it at all.

The pattern has been adjusted for her height (or lack of!), but I added in some extra length to save needing to add a band at the base.


Pattern: Ascent Fleece* by 5 out of 4 patterns*
Fabric: Fashion Fabrics
* – affiliate link

5 out of 4 – 20K Blog Tour

If there’s one thing about the British weather, it’s remarkably unpredictable! We always joke that you can spot a tourist by the way they’re unprepared for rain, or unusually cold snaps, so it seemed a logical step to make myself a warm fleece as part of the 5 out of 4 20k blog tour! Yes, you read that right, 5 out of 4 patterns* has hit 20k members in their facebook group!
Keep reading to check out my make, and read right on to the bottom of his post for details of the 40% off sale and giveaway!

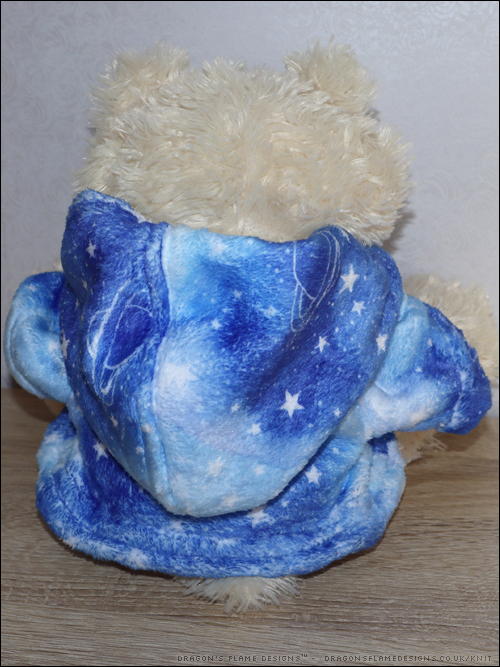
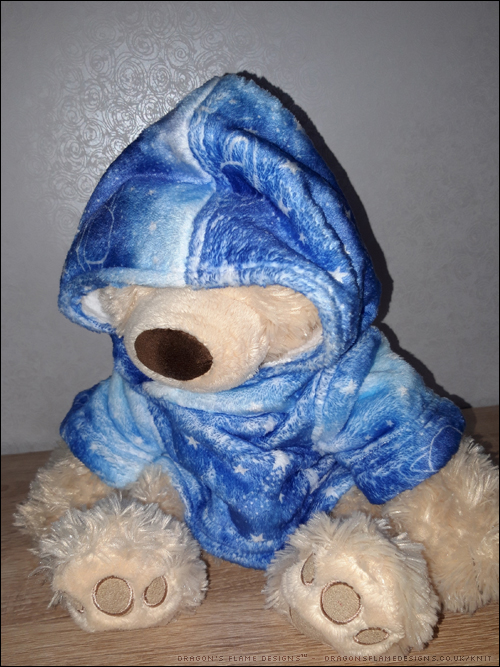
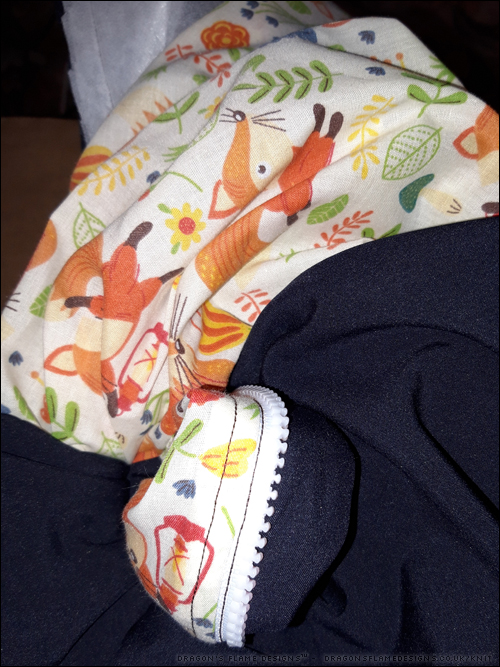
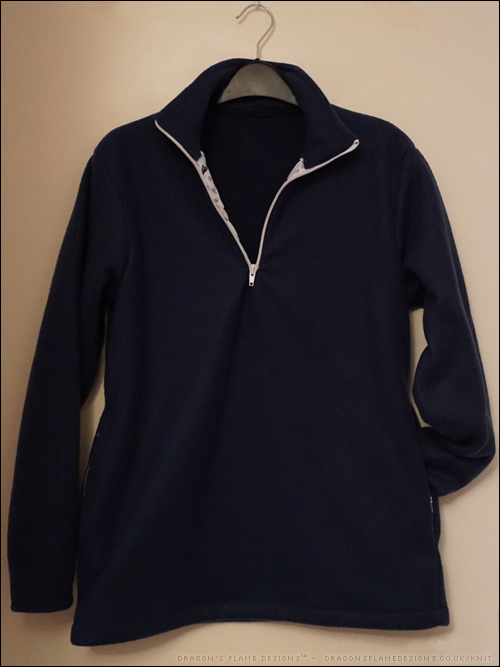
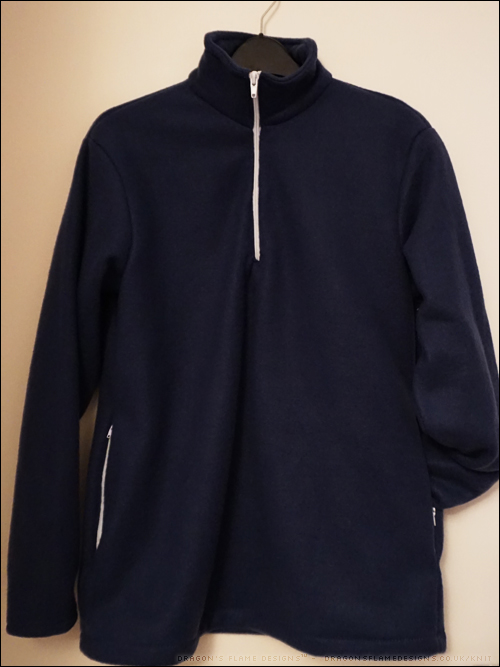
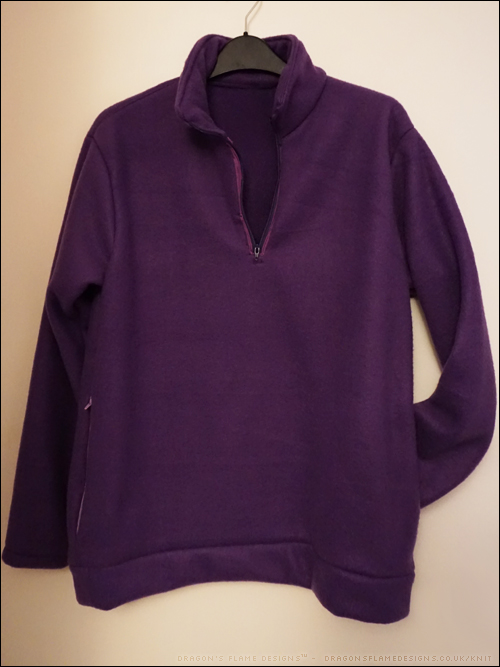
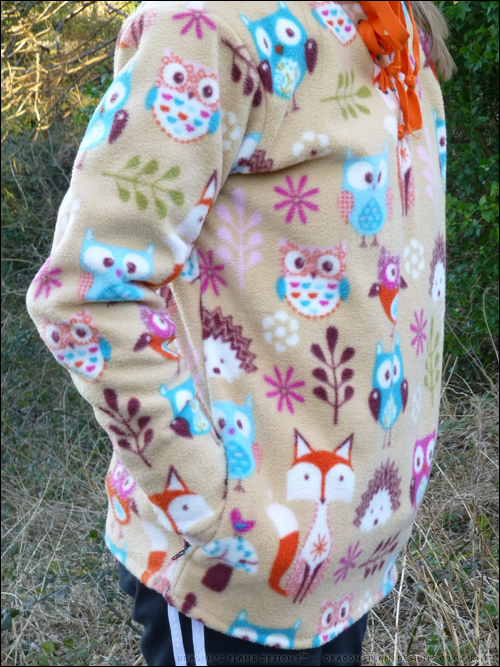
I used the Ascent Fleece* pattern by 5 out of 4 patterns* again, but you’ve probably noticed that my fleece looks totally different from the other Ascent I made before. I’ve got a couple of RTW full-length zip fleeces, but I never find it comfortable to zip them up further than the base of my neck, so I thought a lace up style might be more user-friendly, while still keeping me warm!

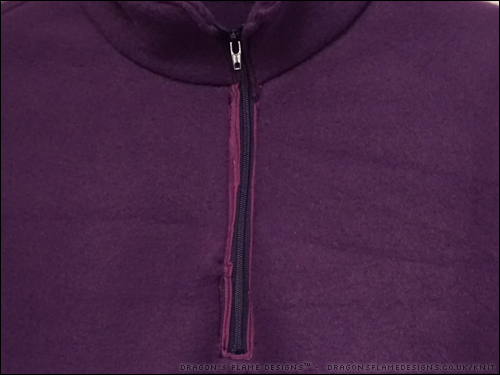
I had to deviate from the pattern quite a bit to achieve the lace-up look, so I hope you’re paying attention at the back there, if you want to follow along!

Place the facing and front pieces right sides together and stitch as per the instructions. If you prefer to have no raw edges showing (although as fleece doesn’t fray, it’s not the end of the world), you can overlock / zigzag the two long sides and base of the facing first.

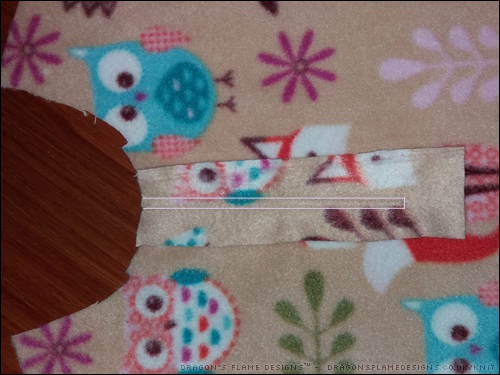
Cut down the centre of the facing stitching, and turn the facing in. The right side of the facing should now be on the wrong side of the front piece. Pin this in place.

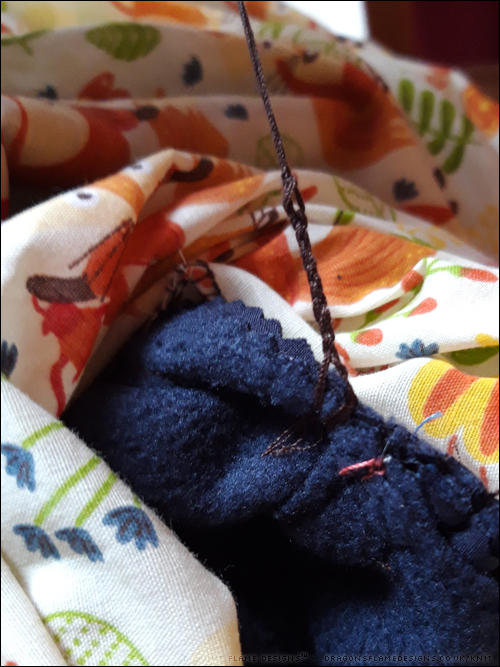
Making sure to leave enough space for the eyelets, stitch down one side, across the base, then up the other side to secure the facing in place. I used a straight stretch stitch just for strength, as it won’t really need to stretch much (if at all). I used 4mm eyelets – there’s not really any need to use huge ones, as long as you can fold the tape or fit the cord through the hole.

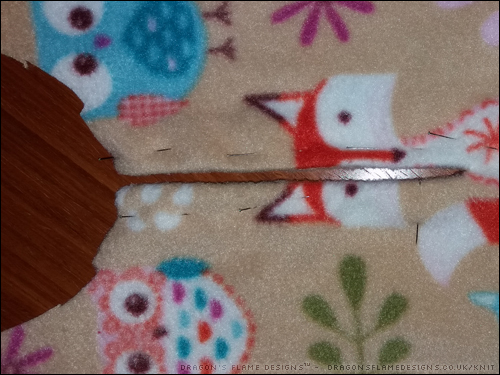
Add the collar as stated in the instructions, but bear in mind that the facing is already sewn in (there’s no zip to fold it around), so when sewing the inner collar to the outer, you can start at the base of the short edge, sew up, along the top, then down the opposite short edge, before turning the inner collar to the inside.

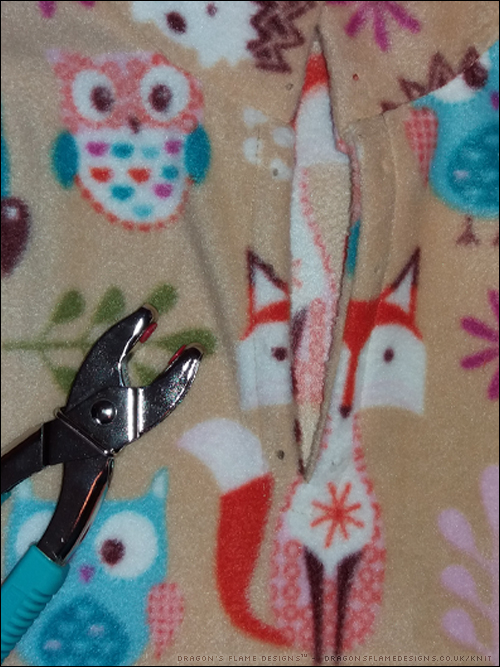
I added in the holes for my eyelets at this point, but because the inner collar base hasn’t yet been stitched, I didn’t add in the eyelets – you really don’t want to be sewing over the top of them!


I used a straight stretch stitch on the ‘stitch in the ditch’ around the collar base, but decided to skip the top stitching around the top of the collar. I didn’t think it was necessary as the collar stands up fine without it. Really that’s just personal preference – the majority of RTW fleece tops do have that topstitching.

I started fitting the eyelets at this point, but stopped part way through as the thickness of the fleece was proving a bit of a challenge. I will admit I made a mess of 5 or 6 eyelets before I managed to get the fleece to behave, and all the eyelets in place.

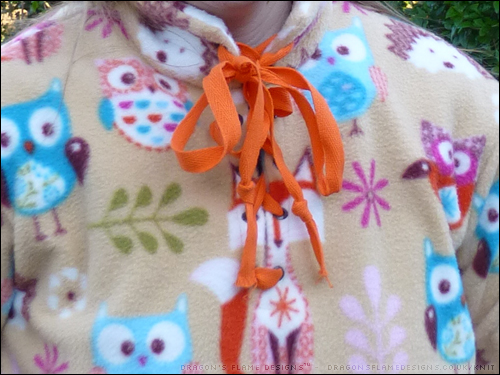
I used a metre of plain tape and just threaded it through the eyelets as if I was lacing a shoe. I could probably trim the tape down a little, but I’d rather have it too long than not long enough. It was worth the hassle of the eyelets, as it certainly helps to keep the cold out, while being fully adjustable!

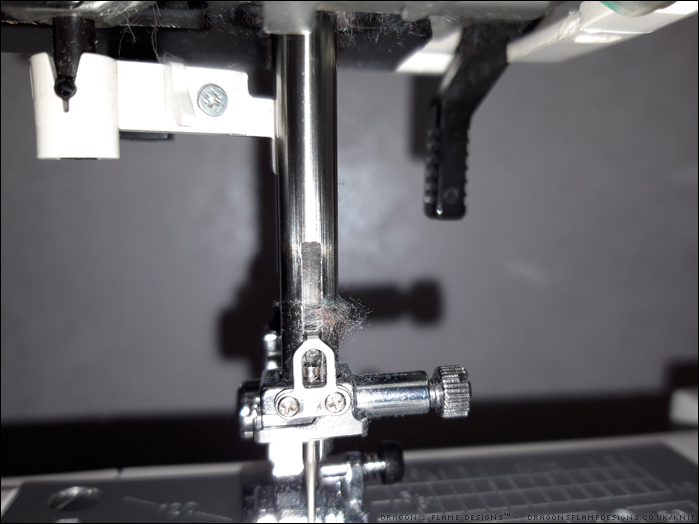
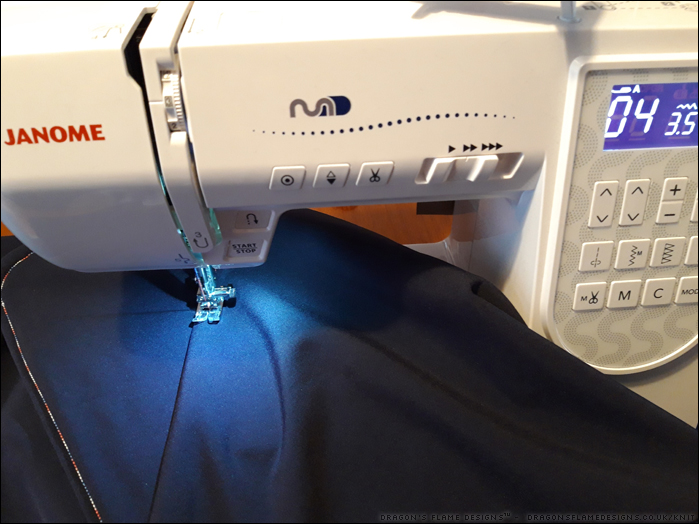
Can I just say that I love patterns which use a 3/8″ seam allowance, as that is the same as the width of my walking foot, so it’s really easy to line up on straight edges and on curves.

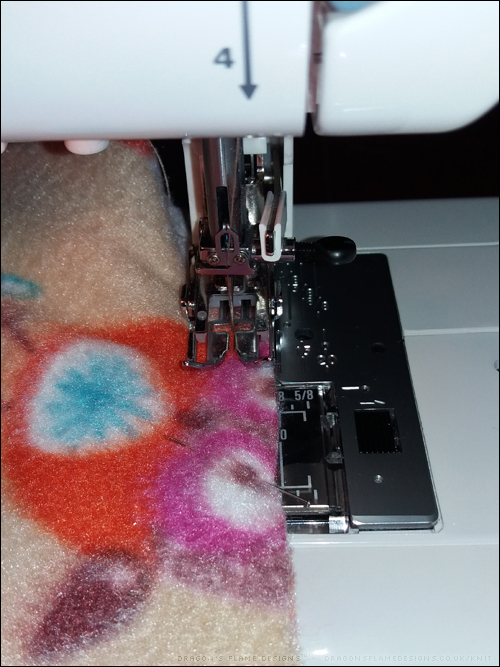
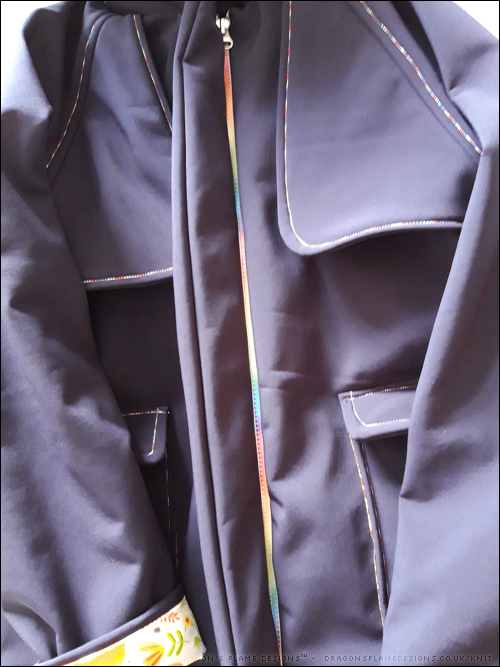
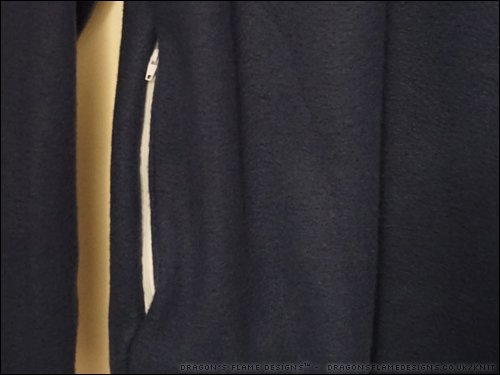
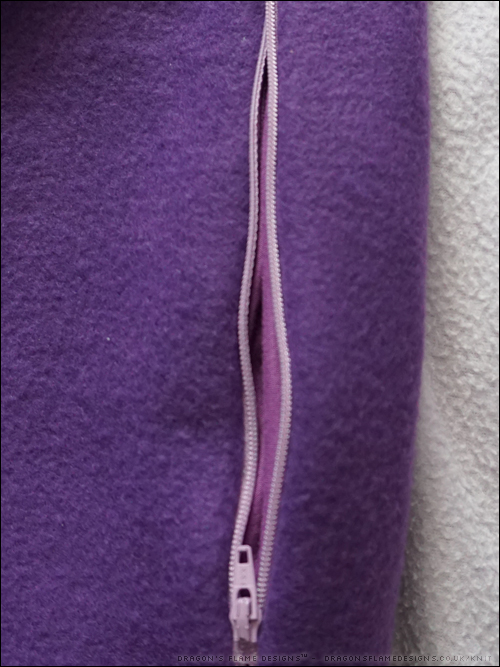
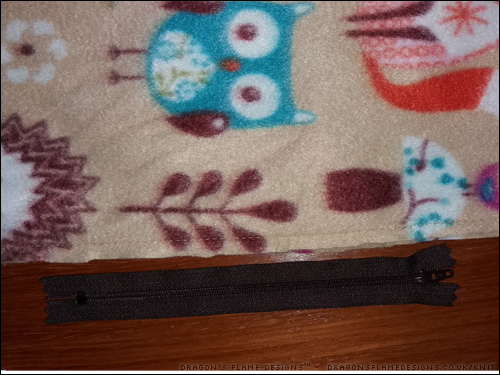
On to the pockets next, and another small deviation. I don’t have a concealed zipper foot for my machine (and really don’t want to fork out £20 or so for a branded one), so I picked out two standard zips instead. Rather than following the instructions, I used the method I came across before, for adding a zip to a dress.
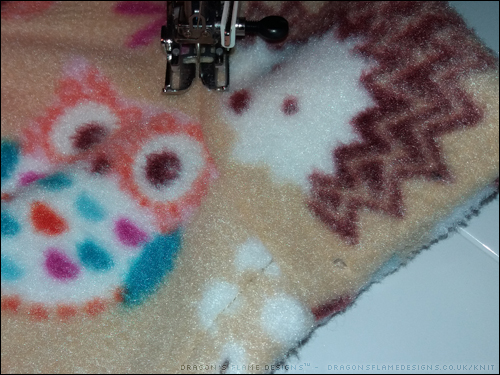
You sew the side seam, then backstitch just where the zip is meant to start. Change the stitch length to the longest straight stitch you can, and tack (baste) for the length of the zip. Change back to whatever stitch you were using on the side seam, take a couple of stitches forwards, then backstitch to lock that in, before finishing sewing that seam.

If you look closely, you can see the difference in stitch length between the main seam (to the right of the zip) and the tacking where the zip will be.

Then you place the fleece wrong side up, and position the zip face down over the tacked stitches. I did straighten the zip out before sewing, as I realised it was somewhat wonky the way I’d pinned it to start with!

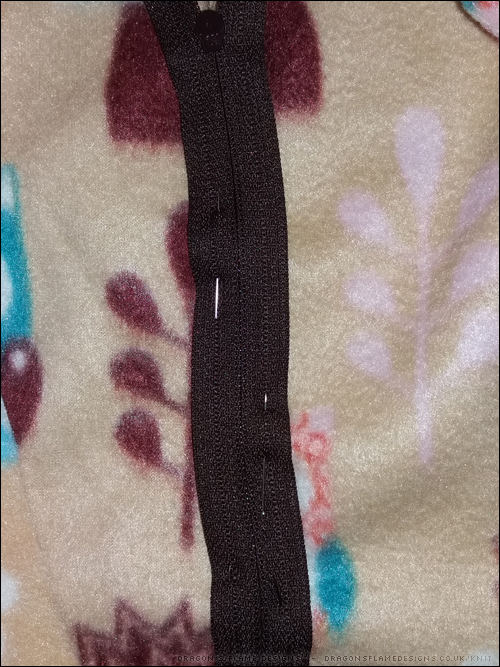
Turning everything right side up, carefully sew the zip into place. I kept the walking foot on for this step, so I had to sew half the zip at a time (I couldn’t get the zipper pull to move past the walking foot), but if you sewing machine will cope with the fleece and a zipper foot, that is a much better option.

Then just unpick the tacking (basting) stitches to open the pocket up and make it usable! This method will result in the stitches and the zip showing a lot more obviously than if you were using a concealed zip.

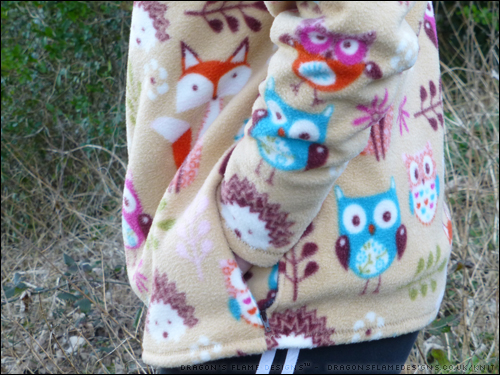
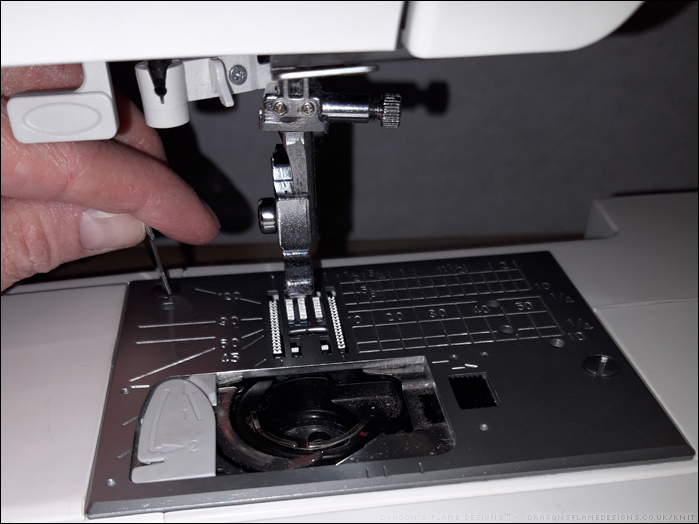
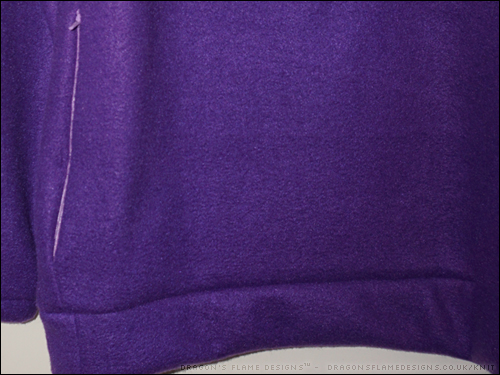
I added the pocket linings as the instructions stated, although I did use the main fabric for the pockets as well – I like to be able to plunge my hands into warm, cosy pockets on a cold day, so fleece was a necessity! That has made the front a little more bulky, but to my surprise my machine handled all those layers with no trouble at all when it came to hemming the base.

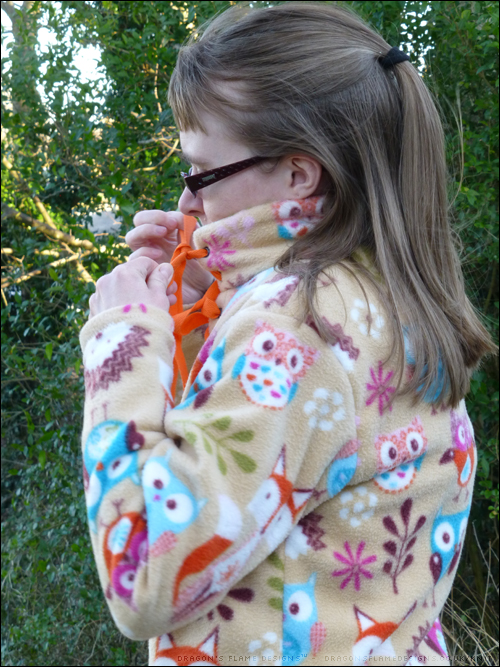
Although it was a cold windy day when these photos were taken, I was perfectly warm with my fleece top. It was definitely a wise idea to use the same fabric for the pockets, as my hands were suitably warm and toasty!


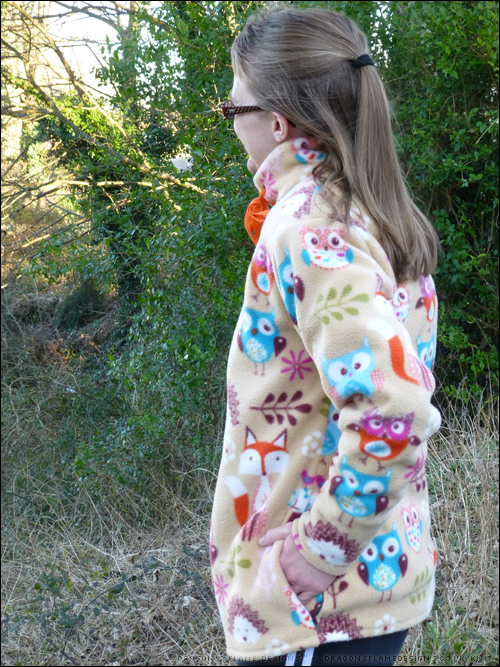
Never a wise idea to not have your hair tied back fully when it’s windy!

Wondering where the blog tour will take you this week? Here’s a handy little schedule to make sure you don’t miss any of the stops 🙂

5 out of 4 Patterns 20k Blog Tour Schedule

April 2 – Tales from a Southern Mom | Miss Marah Sewn

April 3 – Dragon’s Flame Designs | Poppy Monroe Collection

April 4 – Pear Berry Lane | Candi Couture Designs

April 5 – Sewing with D | Kathy Kwilts and More

April 6 – The Sassy Seamripper | My Heart Will Sew On

And to top off their celebrations, 5 out of 4 patterns* are not only offering 40% off their patterns (excluding Gloria) from Monday 2nd April through Saturday 7th April with the code SOBIG, but also have an amazing giveaway you can enter! Check out the prizes on offer (and how to enter) in the Rafflecopter box below!

a Rafflecopter giveaway

And good luck!


*

Pattern: Ascent Fleece* by 5 out of 4 patterns*
Fabric: Mark Pickles Sewing Studio
* – affiliate link

Ascent – a Late Christmas Present

Last Christmas, I was stuck for something to get for a relative, and made them a little “IOU” for a fleece top. I came across the purple fleece and realised it could work brilliantly with the 5 out of 4 Ascent Fleece pattern*.

I’ve never attempted to add a zip into fleece before, so this was going to be an experience! The first part to tackle was the facing for the top zip right on the front. This is the most visible zip, and of course is the one I struggled the most with.
My sewing machine really didn’t approve of the jersey I’d picked for the lining being on the base against the feed dogs, and nothing seemed to feed through evenly at all. I decided against unpicking it, and figured that the facing could be a decorative feature at that point.

The pockets were much easier to sew the zips into:
 

I used the same jersey as the pocket lining, but the relative I made it for has since commented that the pockets feel “funny” inside, and she’d rather have the pockets warm and furry…. so I’ll take that as a hint, and make her a second one so she has a choice!

I shortened the pattern to allow for her height, but when she tried the fleece on she commented that it was a bit too short, especially considering the 1″ hem I was going to sew. So I added in a band to the base of the fleece, which also saved the need to get a precise hem pinned and stitched!

From a distance, you wouldn’t really know that top zip was a total nightmare, would you?


Pattern: Ascent Fleece* by 5 out of 4 patterns*
Fabric: Fashion Fabrics
* – affiliate link