Tag Archives: present

Loyalty Card Wallet

I don’t know about you, but I have so many loyalty cards, it’s hard to find the right one in my wallet! So when I decided to give a relative a Starbucks card as part of their Christmas present, I thought I’d sew a basic wallet to store it in.

I found the pattern at Crafty Cupboard, and found this one a lot easier to follow than the previous wallet I’ve made. I didn’t have any fusible fleece, so I used some lightweight interfacing on the lining and the outer fabric, just to give it some more stability.

wallet1

The pockets aren’t lined, so I’m not too sure how well they will last, but it looks strong enough for the moment. I used a hair elastic and a hand-sewn button to close the wallet – the last one I made didn’t have a closure, so there’s a risk of the cards sliding out in your bag.

wallet2

I was hoping to find a novelty button with a cup of coffee painted on it, to go with the Starbucks theme, but there didn’t seem to be any about so I resorted to a plain black button instead, to match the hair elastic.

Reggie the Reindeer

When I spotted the pattern for Reggie the Reindeer, I knew I was going to want to make at least one of them. I found a pack of two fleece blankets on sale for £3.95, which were the perfect colours for a Reindeer, so he was a bargain to make!

The first Reggie I made had thread jointed limbs, but this one is for a 9 month old child, so I used the alternative instructions to machine sew them into the seams.

spottyreindeer1

If I was to make a third Reggie the Reindeer, I would probably turn the legs 90 degrees before sewing, so they shouldn’t turn inwards at the hoof, but that’s just a minor annoyance for me.

spottyreindeer2

Mum keeps saying that Reggie is a cow (because of the spotty fabric), but whether you see him as a cow or a reindeer, hopefully little K will like him when Santa delivers the package on Christmas Eve!

K’s New Jacket

A couple of months ago, I knitted a jacket for a friend’s baby boy, K; but he grew out of it much faster than I’d allowed for! K’s Mum asked if I could make a larger jacket that would work for the winter. Trouble is, the pattern I used only goes up to 3-6 months, and she was looking for 9-12 months….

I had a rummage through Ravelry, and came across the Simple Hooded Cardigan by Lion Brand Yarn. It looked pretty similar to the Wee Speedy knit I’d made originally, and with chunky yarn I had a feeling that it wouldn’t be a nightmare to knit.

K's Jacket

The main body is knitted in stocking stitch, with a garter stitch edge to the base and front edges. The sleeves were an experience to try picking up the stitches for – I’m sure I didn’t get them quite as balanced as they were meant to be, but hopefully the sleeves are nice and comfortable.

K's Jacket

The buttonhole was pretty easy, just being a yarn over – I was able to use a couple of buttons from my Mum’s button stash, which catch the light really nicely, but also compliment the blue in the yarn.

K's Jacket

I purposefully chose a variegated yarn, as I wanted to have some additional interest in there (and the original one was knitted with one strand of white and one strand of blue, so I was looking for something similar). This was Marriner Mermaid Chunky in blue random – only £1.50 a ball and fully washable, which is essential!

K's Jacket

Hopefully we’ll get some nice chilly weather in autumn and winter, so K can wear his new jacket a lot of times before he grows out of this one too! 😉

Skyline

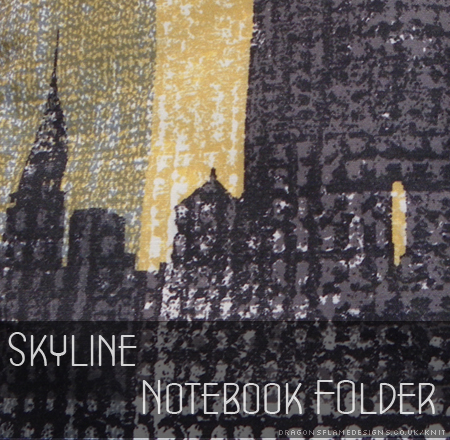
I found this incredible fabric in the sale for just a pound per metre. I’m honestly not sure what fabric this actually is; my best guess is a kind of canvas – slightly shiny and textured and reasonably thick. The fantastic pattern of silhouetted buildings would be perfect to make something for an architecture-loving friend, but I wasn’t too sure what I would be making.

Going back through my folder of downloaded patterns, I came across the Notebook Folder Tutorial from Riley Blake Designs. I’d made one of these previously, but struggled to get all the layers through my Mum’s sewing machine, so I wasn’t too sure how this canvas would behave!

Notebook Folder

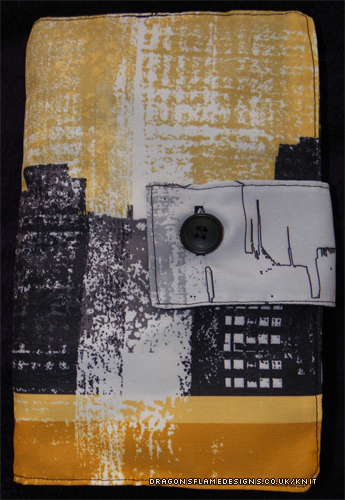
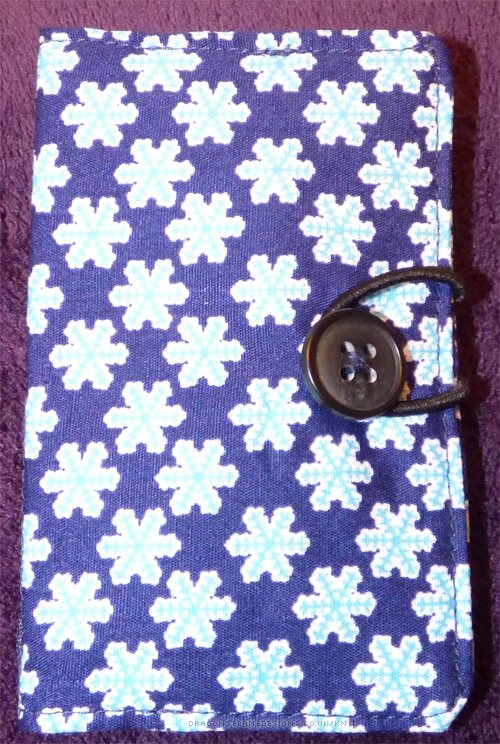
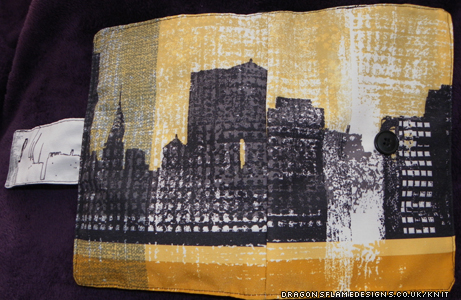
Outer cover, complete with strap and button

The inside of each panel is a black polycotton which compliments the silhouettes and also helps balance the thickness of the fabric.

Notebook Folder

Front cover with strap undone

I don’t trust my hand-sewing enough to stitch the button on by hand, so I machine stitched it on after completing the folder. There was just enough space to sew it in while holding the slanted pocket out of the way.

Notebook Folder

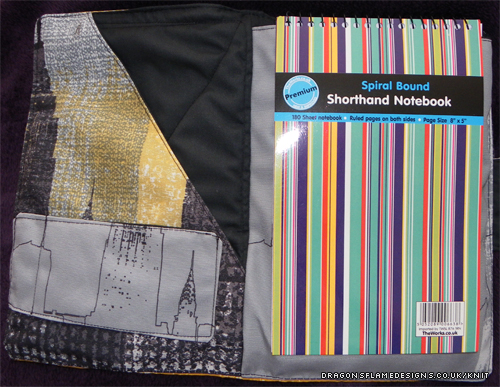
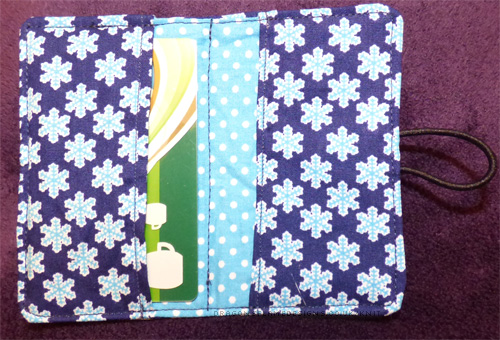
Inside the folder. There’s a pen pocket on the left, and the pouch to the right is large enough to hold an extra large notebook!

I decided to skip the interfacing as the canvas is sturdy enough without it. I couldn’t find any batting in my local shop, so I picked wadding instead and quilted  it to the inside panel so it wouldn’t shift around as I turned the folder the right way around. I also cut the wadding shorter than recommended, leaving a half inch border around, to ensure the final seams wouldn’t overlap it.

The quilting could be a bit neater; if I made another, I might try and make more of a feature of the quilting, picking a better pattern than a simple cross on the back.

Notebook Folder

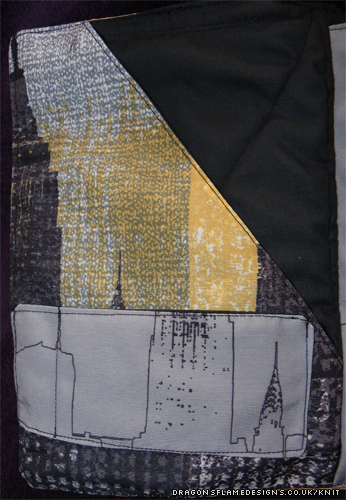
The inside cover – you can just about see the quilted backing behind the slanted pocket.

I used a denim needle in my sewing machine due to the thickness of the canvas. It stitched really easily, which was a pleasant surprise after the struggles I’d had with the previous one on an older machine!

Notebook Folder

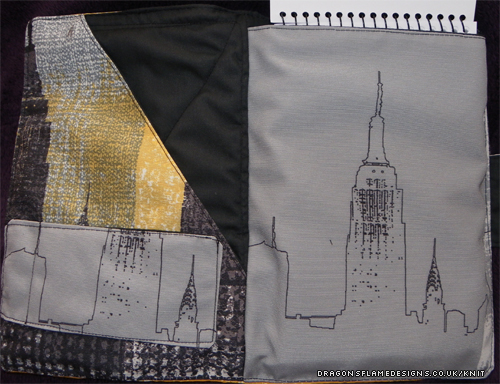
Inside the folder, with the notebook lifted out of the way.

There’s a couple of seams that aren’t entirely straight, mainly because I had the canvas layer on the bottom, and it seemed to slip as the feed dogs fed it through the machine. But overall it came out really well.

Notebook Folder

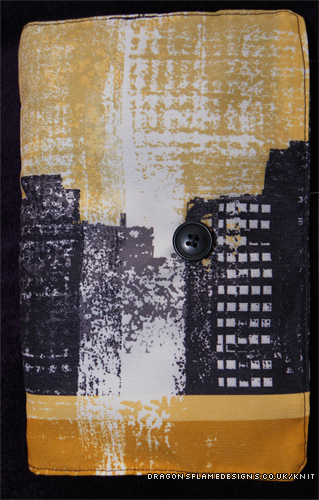
Finished notebook folder – front and back covers, with the strap

A quick little project or two….

I noticed that a friend was using a really tired-looking purse to hold her store loyalty cards, and decided it was about time I made her a little present. I had some fat quarters left over from my last Hobbycraft purchase, and found the perfect tutorial at Midwestern Girl for a  wallet – it’s a perfect size for those loyalty cards, and should save her needing to use that tired old purse any more!

Card Holder (outside)

And inside the card holder:

Card Holder

If I made another one, I would try to get those corners turned out better – that really lets it down on looks. But it’s practical, which is the whole point 😀 I think I would also add a button & elastic to hold it closed, as it’s made quite loose (to fit as many cards as possible in), but that does mean the cards slide about a bit in the pouches.


While I was in a sewing frame of mind, I thought it was time I made my Christmas apron for Gran. Yes I know it’s now March, but Gran requested Christmas fabric for Easter! You can probably just make out the pocket in the photo – that’s slightly higher placed than the last apron I made, and the top is slightly narrower than the first apron, although I think it needed to be slightly wider than I have it. The straps are simple cotton herringbone tape rather than being made out of the same fabric – Gran prefers them to look like that.

Easter Apron

A rush request

I heard from a relative that he was going to be a daddy 😀 ….only trouble is, he told me about 3 weeks from the due date, which didn’t give me much time to make something!

I’ve sewn a couple of messenger bags using the tutorial from Crazy Little Projects before, and knew I could make one in quite a short space of time….  and I’d found the perfect fabric in the sale at just one pound for a metre!

So here we have the Jungle Book Nappy Bag….

Jungle Book Bag (outer flap)

Jungle Book Bag (outer flap)

Jungle Book Bag (back)

Jungle Book Bag (back)

Jungle Book Bag (inner)

Jungle Book Bag (inner)

The panels are (almost) fussy-cut, so the characters lined up nicely. I still can’t get the lining to behave though; it always appears too small when I start, and way too big once I sew the final stitches.

But I couldn’t make something for the parents and not make something for the baby, could I? Using my favourite bear pattern, I knitted Cheshire the Cat-Bear in white and cream yarn which gives him a nice mottled effect. He’s meant to be a bear, but I think his face looks more cat like, so he’s a Cat-Bear 😉

Cheshire the Cat-Bear

Cheshire the Cat-Bear

He should be just the right size for little hands to grab!


Wedding Knits

I’ve finally finished the knitting project for a friend’s wedding….

Wedding Mice

….meet the Wedding Mice! The bride and groom have chosen a green colour-scheme for their wedding, so I thought I’d crochet a green granny square bag for the mice to sit in.

And of course then there’s the mice themselves:

Bride-1

Bride Mouse is roughly modelled on the bride-to-be, although I did change the hair colour to something that worked better in wool!

Her bouquet of flowers was an interesting challenge to sew together – I will admit I managed to break my sewing needle on that one. However, I’m really pleased with how the mouse came out in the end 😀

Her traditional style white wedding dress allows her to show off her bouquet of flowers, and once I finally figured out how to create her hair, the green hairband sets it off perfectly.


Groom-1

The Groom Mouse’s colour scheme is hopefully accurate to what my friend will be wearing on his wedding day – I’m sure I confused him by my questions for what colours everyone would be wearing!

He has a grey suit (the jacket was a “make it up as you go” attempt, as I don’t have a specific pattern for that), black shoes, a crisp white shirt, and of course a nice green tie.

No hair for this mouse (thankfully), but a slightly lopsided pair of ears.


So there you have it, the bride and groom, and they should arrive fashionably early for the wedding…. about two months early! But then it’s better to be early with a wedding gift, rather than rushing at the last minute.

Bride-and-Groom


Patterns used:
May Day Mice by Alan Dart
Granny Square Bag by Wool Warehouse