Category Archives: Clothing

The BIG Vintage Sew-along

I’ve neverBV sewalong - badge_thumb sewn a vintage-style garment before, but when I saw the BIG Vintage Sew-along advertised online, I decided it was worth trying.

I picked a vintage inspired shirt: Butterick 6217, which seems to fit me more accurately than the other tops I’ve tried making so far!

I made a version from a duvet cover to start with, but that was way too big across the chest, and also a bit too low – verging on “indecent” to wear outside!

So this is the sneak peek at my second attempt, made from some fabric I bought in a remnants pack. I took off an inch at the shoulders on the front, adding it back onto the base again, and that seems to have resolved the too-low V-neck problem. I just need to get the buttons attached, then I can get some photos of it actually being worn.

tie-front-sneak-peek

New Look 6483

The June 2016 edition of Sew Magazine came with a free New Look 6483 pattern – with 5 different styles of tops, all able to be made from non-stretchy fabric, I decided this was one I would definitely get a lot of use from.

It’s designed as quite a loose fit, so looking at the finished garment measurements, I chose a size 8…. usually I’d make an 8 for the shoulders and chest, and grade it out to a 12 at the waist, but this one is plenty big enough!

shell-top-1

This was view C, but I have cut the neckline a little deeper – the original line for the neck was much too high for my liking, but I didn’t like the wide nature of view E. I probably would try making that as a proper v-neck next time.

The only real trouble I had in making the top, was making the thread loop…. the instructions weren’t overly informative on how to achieve it, so I had to ask for advice on that. In the end, I made a kind of blanket stitch around the three thread loops, and that seems to work.

button-loop

The fabric is actually a duvet cover from Primark – it’s not the thickest of fabric, but it’s fully washable and will be nice and light for the summer.

New Look 6035

I will admit I made this jacket a while ago, but never got around to taking photos of it!

New Look 6035 came free with an issue of Sew Home & Style and although the rest of the items look good, I had to try making the jacket first. Rather than risking using a fancy fabric for a first attempt at this pattern, I used a duvet cover from Primark for my fabric – it’s polycotton, nicely patterned, and can result in a wearable item if I get the sizing right.

Bias Binding

To make the seam finishes a little neater on the inside, I bound them with some polka dot bias binding. It looks a lot nicer than just zigzagging the edges, and should hopefully be more sturdy when washed.

Overall, it’s a good fit – I made view B, which is a perfect sleeve length for me. I didn’t add any pockets, mainly because I wanted to concentrate on the shape and size of the jacket itself, but if I made another one, I definitely would add the pockets in. It is unlined, so the jacket is quite thin (mainly due to the thinness of the duvet cover), but if it was made in a denim-weight fabric, it would be an ideal Spring / Autumn jacket.

Black Jacket

I do want to try making a heavier-weight jacket, so I think I would probably give this one another go at some point – the shoulders are a perfect size (usually across the back, a jacket can be too snug for me), although the sleeves were a little wide at the end.

New Look 6230

Sew Magazine came with a free New Look 6230 pattern a couple of months ago, and I was drawn to the baseball t-shirt look. It doesn’t have set-in sleeves, which is a nice bonus as set-in sleeves and me don’t tend to get on!

I found some really funky fabric, but I decided it was a bit too busy to use for the entire top, so I balanced that out with some plain purple. Again all the seams are zigzagged, including the top stitching, so they should stretch with the fabric. I did get in a bit of a mess trying to attach the collar, but apart from a few pleats and stretch marks on one side, it looks pretty good. I’m still struggling to work out the size I need though – this one was way too wide on the neckline, so I brought in the body-sleeve seams by about 1/2″ on both sides to try and narrow the shoulders a little.

New Look 6230

The sleeves are nice and roomy, but I think if I make another of these, I would try the smaller size for the shoulders, and just widen it a little at the waist to try and get a more suitable width on the shoulders.

New Look 6230

New Look 6230 – excuse my unphotogenic eczema-covered wrists and hands


Sewing With Knits – Fleece Hoodie

The thought of sewing with stretchy fabric terrified me – I’d heard all sorts of horror stories about how the fabric stretched out of shape while sewing, or all the stitches snapped when the person tried on the finished item. However, I couldn’t find a hooded sweatshirt in the shops that suited me, so I wanted to try making my own.

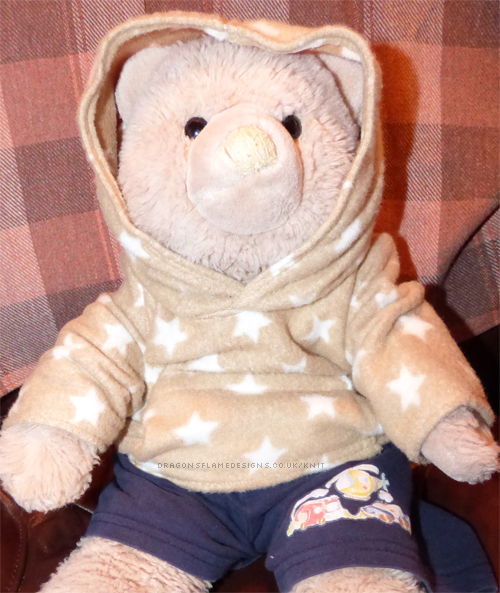
Craftsy had a sale, so I decided to take the plunge and enrol on the Sewing With Knits course. It includes 5 patterns for different items of clothing, including a fleece hoodie. I printed off the pattern in a smaller scale to start with, and stitched a teddy bear sized hoodie as a test run.

Pockets are always useful, so I added a free-style kangaroo pocket to the front.

Mini Fleece Hoodie

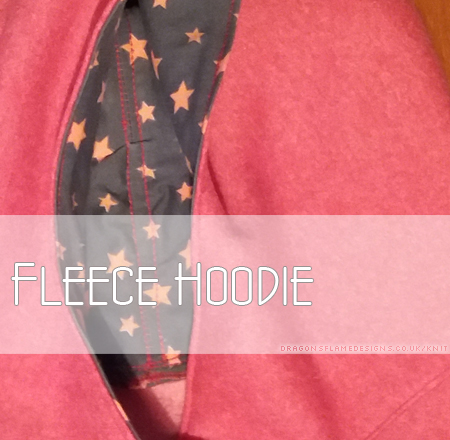
Spurred on by my success, I went searching for sweatshirt fleece. This was surprisingly hard to find, but I eventually came across a really nice red fleece, which has slightly lighter red stars printed on it. Not wanting the fleecy side to be against my hair on the hood, I also picked 50cm of jersey fabric to use as the hood lining.

The pattern doesn’t include a hood lining, so I used my usual method of trial-and-error to get it to line up. Admittedly some of the top stitching down the sides of the seam aren’t entirely level on the lining, but that’s not overly noticeable unless you look really closely. To get the lining attached to the hood, I left a small gap on back neck edge to turn it the right way out – as that’s underneath the hood, it’s not too obvious that there’s an extra line of top stitching there just to hold that seam closed.

Fleece Hoodie

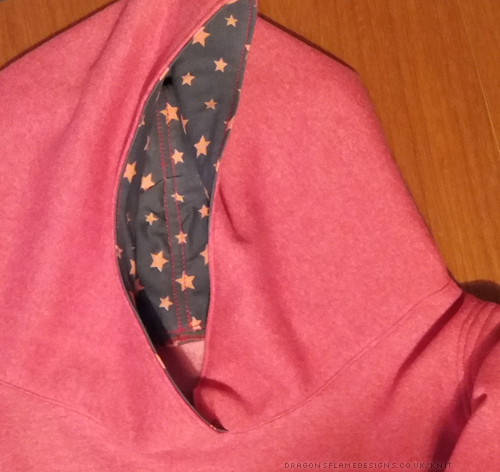
All the seams were sewn on my regular sewing machine, using a zigzag stitch. I do have a stretch stitch option, but the craftsy course used zigzags, so that’s what I stuck with. I haven’t decide yet if I should attempt a double zigzag hem, or if a twin needle hem would work better – it’s mainly down to the bulk of the fleece, which one would look the neatest.

New Look 6178

I’ve been struggling to get the sizing worked out for fitted clothing like tops and dresses – no matter how closely I follow the instructions, there’s still a weird bit of excess fabric on the neck, or it’s too snug on the waist. So I thought I’d try using some jersey offcuts I’d bought as a bargain buy from my local fabric shop, and make myself a vest top or two.

New Look 6178 is relatively easy to make, with no darts or equally awkward points to mark and sew. The straps were the most fiddly part, as the stretchy nature of the fabric didn’t lend itself to being pinned…. I think clips might have worked better, but eventually I got them to behave.

New Look 6178

I’m only 5′ tall, so I did shorten the pattern to ensure the waist was at the right point. Unfortunately this means the first one (the black & reddy pink vest on the left) is a little shorter than I’d like, but it’s still wearable. I added several inches onto the length for the purple one, so I can find the ideal length before hemming it.

Stitching on my regular machine, I used a zigzag for the main stitching, but I’ll use a double needle and a straight stitch for the hem, just to give a more professional finish.

Hooded Towel

I was searching for a suitable “first birthday” gift, and came across Amber’s Hooded Towel pattern, which seemed ideal. I couldn’t find any brown towels, so I picked cream, with a tan shade for the nose and inside of the ears, plus a white flannel for the whites of the eyes (the black pupil was made from acrylic felt).

It came together really easily, considering it’s the first hooded towel I’ve made, and I hope the little boy likes it!

towel

Because it worked so well, I’ve already got plans for another one for another child’s first birthday coming up later in the year – maybe yellow towels to make Winnie-the-Pooh.

Another jacket – blazer

I was browsing through some blogs the other week when I came across Melly Sews and their fantastic free blazer pattern. With the words “free” and “jacket”, it wasn’t something I was going to pass up on, so I printed the pattern and started cutting & sticking the paper together.

It’s only a one-size pattern, which unfortunately for me is too tight across the back and the arms. However, undeterred by that, I set about adding an extra inch on the back panel and side seams.

The pattern calls for patch pockets, but there’s something about patch pockets that never look right to me – maybe it’s my poor quality top stitching, but they never seem to fit the look of a smart jacket. So I followed the instructions for welt pockets instead:

Welt Pockets

They aren’t perfect, they’re pretty shallow, but they’re usable and that’s what counts!

I needed to make a lining, and I didn’t want to use the same fabric to line it with, so I bought some plain blue polycotton to balance out the patterned polycotton on the outside,

Blazer

I think this jacket looks quite similar to the CC one I spotted earlier in the year, with the back vent and notched collar. Ok, my top collar is actually round the wrong way – the lining fabric should be on the inside not the outside, but that adds some individuality to the jacket I think,

And the best part of this jacket? The only hems are on the sleeve cuffs – the lining is sewn to the main fabric around the base then turned round the right way, so there’s no massive hem at the base to sew up! 😀

New Look 6231

Finally I’ve completed the hem on the jacket! This was the first jacket I attempted, and it’s been sitting on a clothes hanger for ages while I plucked up the confidence to tackle the hem.

The peplum gives the jacket an interesting shape, but unfortunately it also gives it a curved hem…. and that was something I really struggled with.

The inside of the hem isn’t the neatest and there are some tucks and folds in there, but from the outside it looks pretty neat and that’s what matters. After all, who’s going to see the inside of the hem anyway?

English Tea Dress – take two

Following on from my success with the English Tea Dress, and realising that the style actually seems to suit me a lot better than the “fit -and-flare” style dresses I’ve tried before, I thought it was time I dug out Summery duvet cover, to make a second dress from.

Tea Dress

Of course this fabric doesn’t really fit the English Tea Dress name, so I’ve renamed this one the French Tea Dress. The duvet cover also came from Primark, and was slightly more see-through than the previous one, so I had to make a lining for the skirt. I cheated though, and just cut another piece of each skirt part, then held them together as I stitched the seams, treating the two pieces of fabric as one. I’m positive that not the “correct” way to include a lining, but it worked for me!

Unfortunately, I didn’t have quite the right length of zip, so it’s a little snug to get on and off…. but it still fits, even though there’s a couple of areas on the sides which aren’t perfectly aligned (blame that on adding in the second piece of fabric for the lining – my seams didn’t catch all found layers on the sides, so there’s a few wiggly lines here and there).

Tea Dress Zip

The zip itself is a load neater than the first one – I think I’m gradually getting the hang of this now! All I need to do next is find some shoes to wear with it – trainers just wouldn’t look right.