Category Archives: Clothing

Shirt Inspiration – a Simplicity Sewing Challenge

I’ve made clothing for myself before, but the only wearable things I’ve ever made my dad (that fitted successfully) was a fleece hat. I think it’s about time I made hime something different, don’t you?

So I entered the menswear category of the Simplicity Challenge as an incentive to get something made.

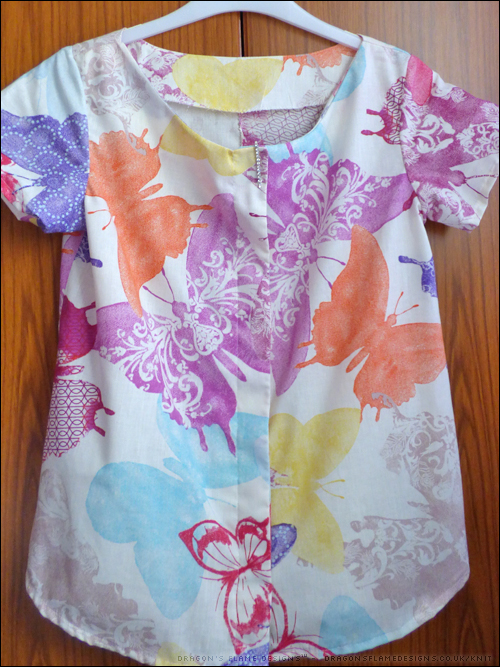
At the moment I have taken the measurements (I didn’t want to rely on what dad said he measured!), and I’ve picked out some polycotton to make a “wearable muslin”.

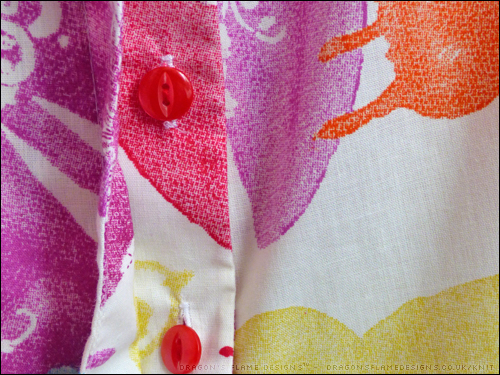
I did get in a complete mess with sewing the facing – a combination of partially-written instructions, and a distraction while sewing, meant that I didn’t quite get it lying accurately. However, other than adding in the buttonholes and buttons and the final hems, this should be a shirt Dad can wear.

It does look a bit…. boring though. Plain polycotton might have been dad’s choice, but it isn’t going to look all that startling. So I had a rummage through dad’s wardrobe to see the kind of shirt design he prefers, and there’s a lot of checked fabric in there! I’ve got some gingham fabric and he’s picked out some buttons ready for the final version.

Wish me luck!

Blanc Tee

Rummaging through my bag of UFOs, I came across the pieces for this Blank Slate Patterns Blanc Tee. I’d purchased the fabric over a year ago, cut out the pattern, then didn’t have the confidence to figure out if the sizing was accurate, or if I’d need to grade the seam allowance at the waist.

I decided it was about time I finished it, and stitched the seams exactly as the pattern said. Blanc is quite a loose fitting top, and that style coupled with the really stretchy nature of the fabric, meant it really looked oversized in the shoulders and chest.

Putting it on inside out, I pinned out a new armhole and sideseam, which gives it a much better shape.

Oops – I hadn’t realised the fabric was quite so creased…. I think this proves I need to make use of the iron a bit more!

The neckline is wider than I’d normally wear, and my decision to simply turn and hem the neck has left the neckline a little saggy. I think next time I make a Blanc Tee, I’ll use some bias binding on the inside just to give the neckline some structure.

Overall, it’s a great fit and a complete bargain – the fabric was from the remnants pile in my local shop for £4 🙂


Rivage Raglan

The previous raglan sleeve top I made really didn’t fit properly, as I couldn’t figure out how much ease I would need and ended up making a size larger than was wise…. rather than use the same pattern, I decided to try the Blank Slate Rivage Raglan as I know the Blank Slate patterns I’ve tried before are a good fit.

The fabric came from a mystery lucky-dip bag from Abakhan – it’s not my favourite fabric, so I thought it’d work as a test run to check the sizing.

Obviously Blank Slate patterns are made to a shape that is more like my own than Simplicity patterns. I didn’t have to make any alterations other than the length (being petite, I’m getting used to altering patterns in length so the waist hits at the right point).

I tried to match the stripes, but somehow they became misaligned as I cut the pieces…. but for a trial run, I’ve ended up with a perfectly wearable top and a pattern I know works for my shape. And really, who’s going to notice the mis-matched stripes when I’m wearing it?

Oceanside Shorts – take one

I’ve always been wary of the thought of sewing shorts or trousers. There’s something about the potential alterations that seemed even more scary than sewing neat buttonholes on the front of a shirt! I had attempted some pyjama shorts last year, but never anything that would be suitable to wear outside. But when I spotted the Blank Slate Patterns Oceanside Shorts pattern I decided it was worth a try.

The back is elasticated with drawstrings attached, which gives the shorts a relaxed comfortable fit. I used part of a duvet cover as a trial run, just in case I needed to do any alterations. Much to my amazement, however, there were absolutely no alterations needed!

My finished Oceanside Shorts

The pockets have a neat feature, with the top corner folded over. They are meant to have a decorative button to hold down the corner flap, but I’m still trying to find a couple of buttons shaped liked butterflies which would match the pattern on the fabric.

Shorts pocket - there's a folded corner detail to the pockets

I did make the shorts marginally longer than the pattern stated, but when I make my next pair, I’ll probably just stick to the length in the pattern.

Just to prove the shorts fit, here's a photo of them being worn

I will admit I’ve worn these shorts so much, that the fabric has actually worn through into a hole! Considering the fabric was just part of a cheap duvet cover, I’m not too annoyed – I’ve got a pattern than I know works, and I have plenty of fabric left over, so I can easily make myself another pair the same again.

Working on product testing

There’s no “work in progress” photos this week, as I’m working my way through some product testing fabric for Minerva Crafts. The biggest challenge at the moment, is picking out a pattern to make from the fabric selection – I never realised how tricky that part could be!

Finished Showerproof Shoreline Boatneck

Well, the showerproof jacket is not 100% “finished” as I haven’t added a hood to it, but it’s 90% finished and wearable, so I’m counting that as no longer being a UFO! I ‘hacked‘ the Blank Slate Patterns Shoreline Boatneck to make a button-up shirt, and had the idea of making a showerproof jacket to wear on the allotment.

Sewing with ripstop gave some unexpected challenges though, as it slips around even more than fake fur when you’re trying to sew. I couldn’t pin unless it was within the seam allowance, as the pin holes were challenging and sometimes impossible to get rid of afterwards, so it took a lot of slow sewing and careful pinning to achieve.

The front closes with velcro, so it’s possible to do it up (and undo it) with gardening gloves on.

Eventually there will be a hood that will attach with velcro on the neckline. I decided to make the hood detachable for ease of sewing…. mainly because I was uncertain how to add the hood onto a jacket that had a facing. But it should also make the jacket more user-friendly when it comes to washing it.

So far I haven’t hemmed the sleeves or the base, partly because I wasn’t too sure how long I wanted the sleeves to be, but mainly because I don’t think ripstop will run, so there isn’t really much need to hem them.

The ripstop should be showerproof (although I know if I get caught in a deluge, I’ll still get wet), and hopefully any mud or soil should just be able to be sponged off.

Shoreline Boatneck – another hack in progress

Even before I finished my first Shoreline Boatneck, I was already planning my next one. I needed a jacket to wear on the allotment if it looked like it might rain (typical British summers and all that), and my previous hacked Shoreline Boatneck looked like it would be just the right style.

I found some navy Rip-Stop and floral polycotton at Minerva Crafts, which look like they should be ideal for the jacket I want to make. So far I have most of the pieces cut out, but I’m still working on getting the hood to fit – the hood pattern comes from a different top, so the neckline is a totally different length, which is taking a bit of fiddling to get it to line up properly.


Shoreline Boatneck hack

I will admit that I have never hacked a pattern before – literally every item of clothing I’ve made so far, has been done according to the pattern. However, the Blank Slate Patterns Shoreline Boatneck caught my eye, and was screaming to be hacked into something slightly different.

The pattern itself comes with a ‘hack pack’ with suggestions like a button back, or making it into a dress. But the idea of buttons down the back has never really appealed to me – I wanted to add them to the front. However, my sewing machine didn’t really like me sewing 7 buttons on the front of my previous shirt so I wanted to find a way around that. Really, I needed to stitch the buttonholes first, so if I messed it up, I wasn’t ruining an entire top.

Luckily I found a tutorial for a hidden button placket at Craftsy, which with a few tweaks was able to be used on my Shoreline top. Ironically, those buttonholes are the neatest I’ve sewn so far, but it definitely looks nicer having them hidden from view.

The fabric is a double duvet cover set from Shaws Direct – I actually only used the two pillowcases for this top, so that leaves me with about 4m of fabric I can use for a couple of dresses.

I started the buttons just above the bust level, although I think I could’ve done with adding in another on the neckline just to help keep the shape. But as it is, I can use a small clip as a decorative feature if I want to. The only other change I made was to add a seam allowance to the back, and cut those pieces separately – the pillowcases didn’t quite work out to be the right size to cut the back on the fold!

So there you have it; my first Shoreline Boatneck, and my first pattern hack – you wouldn’t really know that was made from two pillowcases, would you?

An Early Christmas Present

I was looking for something relatively easy to make for K’s Christmas present – his Mum has given me a great idea for a present I can work on for his birthday, but I needed something that would be a faster make for Christmas!

Enter the free Fleece Hat pattern from Fleece Fun – not only was it useful to make my own hat, but it has sizes all the way from baby to extra-large adult! I found just over half a metre of red fleece in my local fabric shop, along with a cute zebra iron-on patch just to liven it up a little.

I did modify the pattern slightly, making the hat a little longer than it’s meant to be, to allow for the brim to be rolled for a snugglier fit. I wasn’t too confident at how the patch would iron on (there weren’t any instructions on it), so I zigzag stitched around the outside just to ensure it would stay in place.

Hopefully we’ll get some seasonal cold weather, so K has an excuse to wear it!

New Look 6483 – take 2

I came across this really nifty fabric in my local fabric shop, but the original top I had in mind just didn’t look right on me. So I decided it was time I tackled New Look 6483 again – you may remember the original version I made back in June.

This particular fabric was a little thin and I really didn’t want to risk it being see-through, so I made a lining from a plain white polycotton. I simply tacked the plain polycotton to the wrong side of the owl fabric then treated it as one piece of fabric.

Dragon's Flame Designs - New Look 6483

When it came to the hem, I wanted the polycotton lining to be hemmed as one, rather than having a separate lining hem. I folded up the hem on the owl fabric and the polycotton lining, then caught the lining hem on the inside as I was sewing.

Dragon's Flame Designs - New Look 6483

I’m pleasantly surprised how well this top came out – I don’t normally wear sleeveless tops, but the armholes look almost perfect with no alterations needed. I kept the neckline as the pattern stated, which gave a nicer curve than I achieved last time. Admittedly adding a lining made the hemming a lot more challenging, but I don’t think it would’ve been wearable without a lining, given the thin nature of the fabric.