Category Archives: Clothing

Nine things to try in 2018

Most years I’ve set out my New Years Resolutions, and a lot of the time I can’t keep them past March. So when I decided to plan ahead for 2018, I took the idea from a “9 things” post on Instagram last month to make my Nine Things to try in 2018.
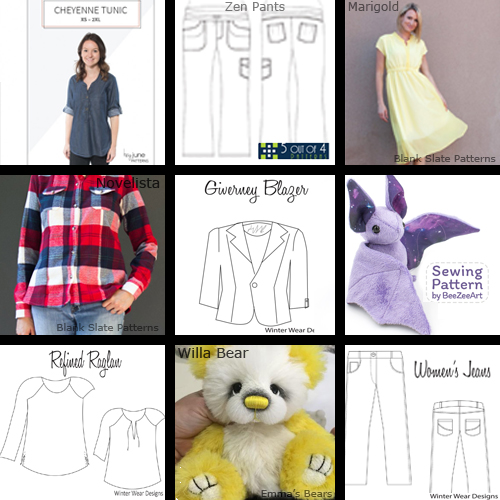
Top row:

  • Cheyenne Tunic* by Hey June Handmade
    I’m hoping this will make a change from trying to find jersey to make t-shirts, and give me a more varied selection of tops suitable for the spring and summer.
  • Zen Pants* by 5 out of 4 Patterns
    I was drawn to the Zen Pants as there are so many rise variations included – I tend to wear medium waist trousers, but I usually wear them a bit lower than they’re designed, so the medium rise of these might work brilliantly. It’s also the first pattern I have that recommends using Ponte fabric, so that will be an interesting experiment!
  • Marigold by Blank Slate Patterns
    I was planning on making the Marigold last summer, but time ran away without me and it was winter before I looked at the pattern again. But maybe this year I will get one made!

Middle row:

  • Novelista by Blank Slate Patterns
    I really dislike sewing buttonholes, so you might be wondering why I have a Novelista button-up shirt on my list…. well, either I’m going to cheat and use poppers, or I’ll add in a hidden button placket so you get a neat front without the stress of ensuring all those buttonholes are perfect.
  • Giverney Blazer by Winter Wear Designs
    Back when I started trying to sew clothing, I hadn’t read the information that said “jackets are hard to make” so naturally I made myself a few blazer-type jackets from duvet cover fabric. Other than one collar being put on the wrong way around, they came out surprisingly well! So I decided I really should make myself a decent blazer this year, out of some fancier fabric than a simple duvet cover. This pattern uses woven fabric, so there should be a great selection available in my local fabric shop.
  • Bat Plushie by BeeZeeArt
    On to the bats, and I admit I have made a few of these bats before! But when I was sorting out my bag of fabric last month, I came across some spare black and blue plush fabric which is just calling out to be made into a bat or two (or maybe three!). Because the wings and inner ears are made from woven cotton fabric, it’s a great pattern to use up oddments, or to so slightly crazy with glow-in-the-dark fabric like I did for the latest two bats I made.

Bottom row:

  • Refined Raglan by Winter Wear Designs
    Another top, but it’s not quite what you’re thinking – the Refined Raglan is made from woven fabric, not jersey! It includes details on how to alter the pattern to fit your individual shape, so it should be more successful than some of the previous woven tops I’d tried making – those never quite fitted ‘right’.
  • Willa Bear by Emma’s Bears
    On the theme of plushies, I’ve been wanting to make a Willa Bear for a while, but haven’t managed to get to grips with adding in non-jointed limbs…. hopefully this year I’ll find enough patience to sew them on, without arguing (too much) with my sewing machine!
  • Real Deal Jeans by Winter Wear Designs
    The thought of sewing jeans is quite scary to be honest, but if I can get to grips with some of the other patterns, then maybe (just maybe) I’ll hunt down some stretchy denim and try making some jeans! As with the other Winter Wear Designs patterns, the Real Deal Jeans have a section on getting the perfect fit, with the relevant pattern alterations you need for each fitting problem.


So there it is, my 9 things to try in 2018…. but it remains to be seen if I manage to make any of them this year! If I don’t, it’s no big deal, but I thought having an aim at the start of the year might help focus my attention a little!


* affiliate links


Fingerless Gloves Inspiration

Have you seen the 12 days of Christmas discounts and freebies over at Winterwear Designs? One pattern in particular caught my eye – the Alpine Fingerless Gloves are exactly what I’ve been trying to find. Unfortunately the eczema on my hands is so bad at the moment that I can’t sew anything, but I couldn’t resist planning a few pairs of these gloves!

The Alpine gloves are designed to be made from stretchy fabric, so they could look fantastic in sweatshirt fabric, or fleece.

  1.  Lucky Cards Sweatshirt Fabric – Minerva Crafts
  2.  Aztec Stripe Ponte – Minerva Crafts
  3.  Forest Animals Fleece – Minerva Crafts
  4.  Bugs Sweatshirt Fabric – Minerva Crafts

And for Spring, when my hands still need covering, but fleece might be too warm, a couple of pairs in jersey might be ideal.

    1.  Floral Print Stretch Mesh Jersey – Minerva Crafts
    2.  Rainbow Geometric Stripe Print Jersey – Minerva Crafts
    3.  Blue Butterfly Meadow – Fabric Land
    4.  Zoo Cotton Mix Jersey – Abakhan

Maybe if I’m lucky, Santa will take the hint and leave me some stretchy fabric under the tree, so i can make one (or five) pairs of these Alpine Fingerless Gloves in the new year!

Halifax Funnel Neck

After my success with the Halifax Hoodie, I thought I would use up some oddments of sweatshirt fabric on another Halifax*.

I had just enough of the spotty and red fabric left over to make view D this time, but I kept the thumbhole cuff idea as that will save me needing to wear gloves!

I don’t normally wear funnel necks, so this was going to be a total experiment and a learning curve on how to fold the funnel to make it work properly. After reading the instructions through a couple of times, I folded the fabric the right way, and even inserting the eyelets went smoother than before!

If I want to be really picky, I could actually have made the funnel neck a little higher, so it would be cover my nose on a chilly day! But for a first attempt at a funnel neck, it’s come out surprisingly well.

If I’d thought things out a little better on the colour blocking, I would’ve used grey for the cuffs, probably grey for the pocket with the red on the edge, and maybe even red for the funnel. But that might have looked a bit too crazy!


* affiliate link

Pattern: Halifax Hoodie by Hey June Handmade*
Fabric: Fashion Fabrics
Trim: Sew n Sew


An Early Christmas Present

Seeing as the Halifax Hoodie went so well, I had a crazy idea to make K a hoodie as an early Christmas present. Hey June Handmade’s Hatteras Hoodie* is made in exactly the same way as the Halifax, so I felt reasonably confident at my ability to make it.

I chose some blue spotty sweatshirt fabric for the main body, along with some ‘cops and robbers’ t-shirt fabric for the hood lining. To break up the spots, I also cut the cuffs and waistband from the t-shirt fabric.

The Hatteras pattern doesn’t include a drawstring around the hood, which meant I could skip hammering in any eyelets! It also doesn’t include binding on the edges of the pocket, but I added those in just to give some interest to the front panel.

The sweatshirt fabric isn’t brushed like you would expect – it has a furry feel to it, and a definite nap. This means it should be snug and cosy to wear, but did give me some challenges when it came to sewing. I’ve sewn faux fur fabric before, but never anything with the furry side facing out. Of course that resulted in the fabric slipping mid seam, which was a nightmare when it came to attaching the hood.

After two mis-sewn seams, and unpicking far too many stretch stitches, I was at a loss for how to resolve the problem. In desperation, I attached a walking foot, and reverted to a zigzag stitch instead of a stretch stitch – it was the only thing I could think of to try.

Much to my amazement, that did the trick! The hood stayed pinned as it was meant to, and even the cuffs weren’t as terrible as I thought they could be.

The pattern on the cuffs is upside-down…. but that’s an intentional design. I like the idea of K being able to see the pattern the right way up when he’s wearing the hoodie.

The sleeves are a little snug for the bear that’s modelling it, but hopefully it will fit K perfectly, and keep him warm when he’s playing outside this winter.


* affiliate link

Fabric: Fashion Fabrics

Halifax Hoodie

Ever since I made a hoodie from a Craftsy course last year, I’ve wanted to make a hoodie with more of a traditional sweatshirt style. Searching through various websites, I eventually came across the Halifax Hoodie by Hey June Handmade* which looked perfect for the style I was after.

As this was my second ever hoodie that I’d made for myself, I decided to keep things relatively easy, and make style A – a regular-styled hoodie with a split neck. I did make things a little more complicated by choosing to line the hood, and add in the thumbhole cuffs from the Lane Raglan Top* too.

There were a few points where I started arguing with my sewing machine, especially at the point where the neck band is meant to cover the raw edges of the hood and the main body. But a couple of hand stitches helped just to hold the band in place.

I do need more practise (or maybe better instructions!) at adding in eyelets for the drawstring cord. The back of one of the eyelets came off as I was sewing the drawstring channel, and I’m not convinced it’ll stay in position when the top gets washed. At least with the drawstring in place, the eyelet won’t fall off completely – it’ll get caught on the drawstring itself, so I shouldn’t be able to lose it!

I lined the hood with some grey swan jersey fabric and used the same fabric for the binding on the edge of the kangaroo pocket. The drawstring tape is a little brighter than I’d expected, but it picks out the orange bills of the swans.

The instructions for the Halifax are really easy to follow, and it resulted in such a great hoodie, I’m already planning my next Halifax top.


* affiliate link

Pattern: Halifax Hoodie by Hey June Handmade*
Fabric: Fashion Fabrics


Sleek Satin Sewing Success!

I wasn’t entirely convinced that I would get this dress finished in time, but after a lot (and I mean a lot) of unpicking and resewing, I finally have a finished dress!

I went with the idea of using two different fabrics to show off the different pieces of the bodice, and chose a combination of two animal print satin fabrics from Minerva Crafts. The fabric was so sleek and had such a great feel, I also made a small shawl to go with it. I quite liked the semi-frayed look of the selvedge edge so I kept that on the shawl edge.

Originally I had aimed for the yoke and waistband to be in the leopard print, with the rest of the bodice in the tiger print, with the opposite on the lining. However, after a few mistakes, I ended up swapping the lining and main pieces, which thankfully went much better.

I would use satin fabric again, but only for a top – I don’t think my sewing skills are quite up to the task of tackling another dress in such a temperamental fabric just yet. I would try making another dress from this pattern though…. but out of polycotton or cotton instead.

But this has challenged me to make a dress I probably wouldn’t have attempted, out of a fabric I usually would avoid…. and I’ve got a dress out of it, so I’m happy!


Simplicity Sewing Challenge 2017

Fabrics used: Tiger Print Satin, Leopard Print Satin


Pattern? Check. Fabric? Check. Finished Shirt? Check!

I’ve been steadily working on my Simplicity Sewing Challenge makes, and tackled the dreaded buttonholes over the weekend…. much to my amazement, the gingham fabric I chose was a dream to sew! There were no ‘birds nests’ of thread and the sewing machine didn’t try eating the fabric through the bobbin either!

The fabric is a 1″ Check Corded Gingham from Minerva Crafts which works really well. I will admit I didn’t even attempt to match the checks on the seams, but then when you look at Dad’s ready-to-wear shirts, very few of them have matching patterns anyway. I did attempt to get the front checks to line up, but as you can see they were quite a bit off…. but that makes for a more unique looking shirt, right?

I did make a couple of alterations to the pattern; dad’s not all that tall, so I had to take out some of the length. In doing so, I realised I could actually get away with using one less button. As this is going to be a casual-wear shirt, I also left out the button on the collar. Dad doesn’t like to have the top button done up anyway, so there really wasn’t much point in adding one in just for show!

I think it passes the “dad test” – after posing for these photos, he didn’t want to change back out of the shirt, so I think he approves.


Shirt Inspiration – a Simplicity Sewing Challenge

Simplicity Sewing Challenge 2017

I’ve been working on my dress for the Simplicity Sewing Challenge, using a couple of really sleek satin fabrics from Minerva Crafts.

I measured out the bodice, stitched all the seams, then realised the waistline was about an inch lower than it’s meant to be (argh!). So I have to unpick the zip (which didn’t go in quite right in the first place anyway), to let me redo the horizontal bands and hopefully get everything lining up properly.

So, I’ve come to realise that there’s no way I will get it finished before the closing date. If I hadn’t needed to unpick the zip, I might have managed it, but unpicking stitches on a satin fabric has to be done more carefully than on a polycotton, so it’s going to take a while.

I’m determined to get it finished though – even if it will be too late to enter into the competition.

Simplicity Sewing Challenge – Dressmaking Inspiration

“Your take on a Simplicity Make”

….it sounds so easy, doesn’t it? But just how can you show your individuality in a dress?

I had considered using some unusual fabric – maybe combining two colours, to separate the bodice, waistband and skirt.

Or maybe I should move the zip to the side and have a plain back.

Different still, would be losing the zip completely, and putting a front buttoned opening to make the dress into a shirt dress, although the thought of those buttons has me breaking out in a cold sweat!

I even considered taking a leaf out of a previous year’s winner’s book, and making the dress into top and skirt separates.

In the end, I decided to try adding elbow-length sleeves. I dug out some fabric oddments and made a rough version of the bodice, using version C with straps. I drafted a rough sleeve using another pattern I had as a template, and stitched them in.

Realisation 1 was that a boatneck style neckline with straps was never going to work – the straps slid off my shoulders almost instantly, pulling the sleeves with them.

I thought then maybe I needed to go for a smaller size, so I cut a size 10 from another selection of oddments, but realisation 2 was that a size ten made the armsyce way too snug so that it felt like I was about to bust the seam stitches each time I moved,

So it’s back to the original idea of a size 12, and I have just enough oddments left over to make another mockup version to check the fit before I cut into my ‘proper’ fabric.

Wish me luck – I think I’ll need it!