Category Archives: Sewing

Notebook Folder the Third

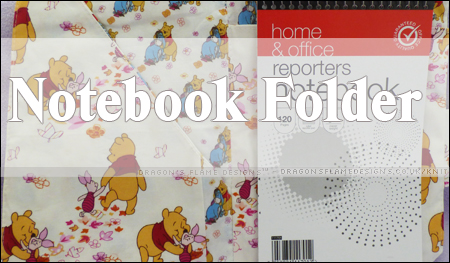
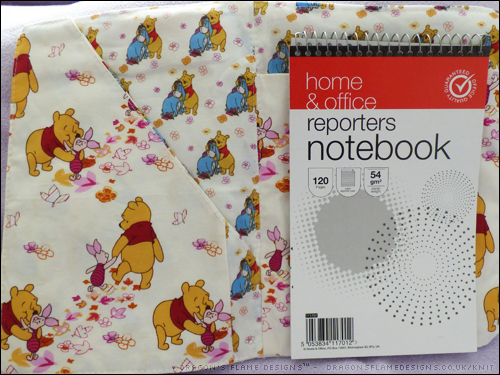
In the run up to my Mum’s birthday, I was trying to think of something I could make as a present. I’m not confident enough to make clothing for her, and she didn’t need a new bag – so what could I possibly make her? I did notice, however, that she was using a reporter’s notebook, which gave me the idea of a new notebook folder for her. The original one I made was on Mum’s sewing machine, and proved a struggle to sew through all the layers of fabric. The second one was easier, although I still used non fusible wadding, so I had to quilt the inside cover.

This time, I was determined to follow the pattern (almost) exactly! I used two fat quarters, a small amount of dress lining fabric, and some fusible fleece, so there was no need to quilt the inside cover.

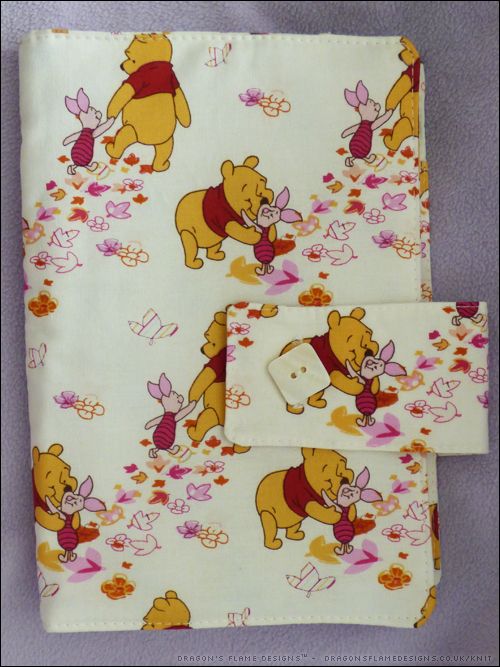
I ensured the button and strap were the right way around this time, as the first attempt had the strap on the inside of the cover, with the seam allowance sticking out… rookie mistake!

I left out the pen and card holders, as Mum prefers to keep her pen separate to the folder, in case the pen leaks.

I cheated on the inside of the notepad pocket, as it seemed a waste to use a fat quarter when you weren’t going to see the pattern. So I used some cream dress lining fabric instead.

The angled pocket was slightly wider than the fabric I had left over, hence the small piece of the second fat quarter in the right corner. But rather than that looking like a mistake, I think it just adds to the quirky appeal of the folder.


Pattern: Notebook Folder Tutorial from Riley Blake Designs
Fat quarters: Hobbycraft


Ping Panda

Meet Ping the Panda! Although he doesn’t really look like a panda, because I used the same fabric throughout. Ping the Panda’s pattern came from a back copy of Sew Magazine. It was designed for mohair fabric, so like the long neck bear, Ping does look a little different to the picture in the pattern.

Ping’s neck doesn’t seem to be elongated which is a bonus, although his paws look like they aren’t quite attached at the right angle. I think his arms are positioned a little too far back, which makes them splay out at the front, rather than being held straight down by his side.

Taking out my never ending quest for perfectionism, Ping is perfectly cuddly and would make a great bed time buddy for someone.

Long Neck Bear

It’s taken a while to get this bear finished, but here’s my first “minky” bear! I can’t remember where I got the pattern from, but I think it’s the same one I used for my purple furry bear a while ago.

The lack of fur length gives this bear a totally different look – his muzzle seems much longer than the purple bear’s. The only real difference other than the fabric is this bear is unjointed, whereas the purple bear has movable joints.

I think I need to improve my sewing skills when it comes to the neck of unjointed bears though, they always seem to have an elongated neck, which does give them a rather unusual appearance. Maybe this one just needs a scarf to hide that a little….

Oceanside Shorts – take one

I’ve always been wary of the thought of sewing shorts or trousers. There’s something about the potential alterations that seemed even more scary than sewing neat buttonholes on the front of a shirt! I had attempted some pyjama shorts last year, but never anything that would be suitable to wear outside. But when I spotted the Blank Slate Patterns Oceanside Shorts pattern I decided it was worth a try.

The back is elasticated with drawstrings attached, which gives the shorts a relaxed comfortable fit. I used part of a duvet cover as a trial run, just in case I needed to do any alterations. Much to my amazement, however, there were absolutely no alterations needed!

My finished Oceanside Shorts

The pockets have a neat feature, with the top corner folded over. They are meant to have a decorative button to hold down the corner flap, but I’m still trying to find a couple of buttons shaped liked butterflies which would match the pattern on the fabric.

Shorts pocket - there's a folded corner detail to the pockets

I did make the shorts marginally longer than the pattern stated, but when I make my next pair, I’ll probably just stick to the length in the pattern.

Just to prove the shorts fit, here's a photo of them being worn

I will admit I’ve worn these shorts so much, that the fabric has actually worn through into a hole! Considering the fabric was just part of a cheap duvet cover, I’m not too annoyed – I’ve got a pattern than I know works, and I have plenty of fabric left over, so I can easily make myself another pair the same again.

Working on product testing

There’s no “work in progress” photos this week, as I’m working my way through some product testing fabric for Minerva Crafts. The biggest challenge at the moment, is picking out a pattern to make from the fabric selection – I never realised how tricky that part could be!

Minky Fleece

Lots of patterns for plushies use what they describe as Minky fabric. I found several American companies that sell it, but nowhere in the UK. I even asked in my local fabric shop, and had a confused look from the salesperson who had obviously never heard of it.

Browsing through one shop online, I discovered that UK stores actually call minky fabric “Cuddle Fleece” or “plush” fabric – no wonder I couldn’t find it anywhere!

I placed an order for a small amount of Soft Cuddle in Cappuccino, which is quite a neat shade of brown, and also some “Rabbit Cuddle” which has more of a random texture to the fabric rather than being totally soft and sleek.

I’ve not yet finished making anything from these, but I have got as far as marking out the pattern on the reverse. I wasn’t too sure what would be the best way of marking the pattern – chalk wouldn’t be that easy to use on the fabric, so in the end I used a biro.


Finished Showerproof Shoreline Boatneck

Well, the showerproof jacket is not 100% “finished” as I haven’t added a hood to it, but it’s 90% finished and wearable, so I’m counting that as no longer being a UFO! I ‘hacked‘ the Blank Slate Patterns Shoreline Boatneck to make a button-up shirt, and had the idea of making a showerproof jacket to wear on the allotment.

Sewing with ripstop gave some unexpected challenges though, as it slips around even more than fake fur when you’re trying to sew. I couldn’t pin unless it was within the seam allowance, as the pin holes were challenging and sometimes impossible to get rid of afterwards, so it took a lot of slow sewing and careful pinning to achieve.

The front closes with velcro, so it’s possible to do it up (and undo it) with gardening gloves on.

Eventually there will be a hood that will attach with velcro on the neckline. I decided to make the hood detachable for ease of sewing…. mainly because I was uncertain how to add the hood onto a jacket that had a facing. But it should also make the jacket more user-friendly when it comes to washing it.

So far I haven’t hemmed the sleeves or the base, partly because I wasn’t too sure how long I wanted the sleeves to be, but mainly because I don’t think ripstop will run, so there isn’t really much need to hem them.

The ripstop should be showerproof (although I know if I get caught in a deluge, I’ll still get wet), and hopefully any mud or soil should just be able to be sponged off.

Shoreline Boatneck – another hack in progress

Even before I finished my first Shoreline Boatneck, I was already planning my next one. I needed a jacket to wear on the allotment if it looked like it might rain (typical British summers and all that), and my previous hacked Shoreline Boatneck looked like it would be just the right style.

I found some navy Rip-Stop and floral polycotton at Minerva Crafts, which look like they should be ideal for the jacket I want to make. So far I have most of the pieces cut out, but I’m still working on getting the hood to fit – the hood pattern comes from a different top, so the neckline is a totally different length, which is taking a bit of fiddling to get it to line up properly.


Shoreline Boatneck hack

I will admit that I have never hacked a pattern before – literally every item of clothing I’ve made so far, has been done according to the pattern. However, the Blank Slate Patterns Shoreline Boatneck caught my eye, and was screaming to be hacked into something slightly different.

The pattern itself comes with a ‘hack pack’ with suggestions like a button back, or making it into a dress. But the idea of buttons down the back has never really appealed to me – I wanted to add them to the front. However, my sewing machine didn’t really like me sewing 7 buttons on the front of my previous shirt so I wanted to find a way around that. Really, I needed to stitch the buttonholes first, so if I messed it up, I wasn’t ruining an entire top.

Luckily I found a tutorial for a hidden button placket at Craftsy, which with a few tweaks was able to be used on my Shoreline top. Ironically, those buttonholes are the neatest I’ve sewn so far, but it definitely looks nicer having them hidden from view.

The fabric is a double duvet cover set from Shaws Direct – I actually only used the two pillowcases for this top, so that leaves me with about 4m of fabric I can use for a couple of dresses.

I started the buttons just above the bust level, although I think I could’ve done with adding in another on the neckline just to help keep the shape. But as it is, I can use a small clip as a decorative feature if I want to. The only other change I made was to add a seam allowance to the back, and cut those pieces separately – the pillowcases didn’t quite work out to be the right size to cut the back on the fold!

So there you have it; my first Shoreline Boatneck, and my first pattern hack – you wouldn’t really know that was made from two pillowcases, would you?

Hello out there!

I know it’s been a while since I posted, but rest assured I’ve been busy sewing. Things have been a little hectic here, so I’ve not had as much opportunity to blog. Hopefully though, everything will quieten down a little, so I can get back to my regular weekly blog posts!