Reggie the Reindeer

When I spotted the pattern for Reggie the Reindeer, I knew I was going to want to make at least one of them. I found a pack of two fleece blankets on sale for £3.95, which were the perfect colours for a Reindeer, so he was a bargain to make!

The first Reggie I made had thread jointed limbs, but this one is for a 9 month old child, so I used the alternative instructions to machine sew them into the seams.

spottyreindeer1

If I was to make a third Reggie the Reindeer, I would probably turn the legs 90 degrees before sewing, so they shouldn’t turn inwards at the hoof, but that’s just a minor annoyance for me.

spottyreindeer2

Mum keeps saying that Reggie is a cow (because of the spotty fabric), but whether you see him as a cow or a reindeer, hopefully little K will like him when Santa delivers the package on Christmas Eve!

It’s Christmas! ….well, almost

Ok, so it’s not quite Christmas yet, but I’ve been busy sewing gifts for people. Some of those people have already opened their presents, but others have been good and resisted the temptation….

I think this has to be the best fat quarter bag I’ve sewn yet! The sides came out really evenly, and the topstitching works brilliantly in red as a contrast to the green main fabric.

jam-bag-brown-bg

The tree ornament was made from felt, with some white ricrac for the icing on the arms and leg, two red buttons for the candy, and some white felt for the eyes. It’s the neatest hand sewing I’ve ever done on the mouth, and the whole thing is sewn around the outside, so there’s no turning involved!

jam-bag

I ended up making a few of the gingerbread men – a couple for presents, and also one for my tree. They just looked too good to just make one 🙂

Purple Bear

Following on from Leopard Bear, I had also bought 50cm of some longer pile fake fur – this had been sitting in a box for a few weeks, while I plucked up the courage to try cutting out the pattern pieces.

Purple-head

Rather than using the same pattern, I found a different one for this bear. The muzzle is longer (this one doesn’t have a chin), but I want to try something even more challenging for this bear – an open mouth! So far I have the head made and trimmed around the muzzle, in readiness for the lower jaw and nose.Once I’ve tackled that, I can add in his ears, then work on the paws!

purple-body

This fabric sheds even more than the black did, but I hope that once the bear is completely stitched up, that he won’t shed any further!

London Tourist Bag

I thought it was time I made myself another messenger bag, and I’m sure that Amber read my mind, as she posted a tutorial for a messenger bag with a zipped pocket.

tourist-bag-front

I wanted the fabric to be different to my previous bag, and this London map fabric stood out in the shop. The lining is a red polycotton, with some blue polycotton and piping around the edge of the flap.

I deviated from the pattern, and added a lining to the front flap pocket, so it doesn’t have any visible raw edges (and fraying ends). The red works brilliantly in there as well, and the pocket edges are just caught into the flap seams, so the pocket is full sized.

tourist-bag-zip

Because a map is obviously directional fabric, I did have to add a seam at the top so that the back and flap could both be the right way up. It was worth the extra figuring out though, as if the map was upside-down, it just wouldn’t have looked right!

tourist-bag-back

I think if I make another one like this though, I would probably change the front zip pocket slightly, and not have the zip reaching the end seams. That would give it a neater finish, and would also lose some of the bulk in the seams at that point.

Leopard Bear

I was browsing the shelves in the fabric shop and came across their small selection of fake fur fabric – it was black but with dark patches, almost like Leopard spots. I decided to take the plunge and buy 50cm to try making a jointed plushie…. my first time of using fake fur, and also the first time I’d ever even looked at bear joints!

Apart from the fur shedding everywhere, and the mistake of using black thread (have you ever tried unpicking black stitches from black fake fur fabric?), I think he came out pretty well! I didn’t trim the muzzle, so this particular bear has no nose…. but from a distance, you wouldn’t know 😉1

His eyes are a little lopsided, but that just gives him a cute, slightly quirky look.

2

Happy Halloween!

How do you make a really good looking Halloween card, that isn’t just full of witches, cats and spiders? I was completely stuck until I came across a book on Zentangles – that gave me an idea…. what if I was to write out the letters, then do a Zentangle style pattern in the middle of each one?

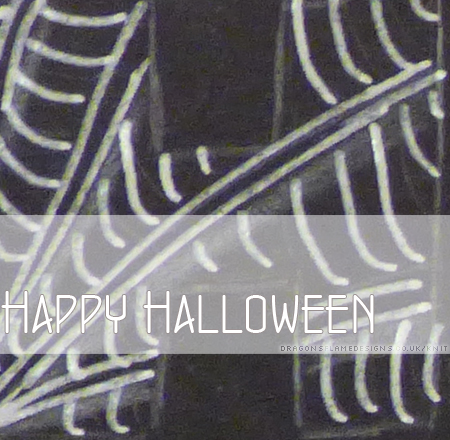
Some black card a white gel pen and a white pencil later, this is the end result:

Happy Halloween

The outside of the card, with a Zentangle-inspired look

The white gel pen wasn’t as opaque as I’d hoped, and some of the patterns needed going over a few times to make them stand out, but it still has a really striking effect on the black!

Happy Halloween - Hobbit

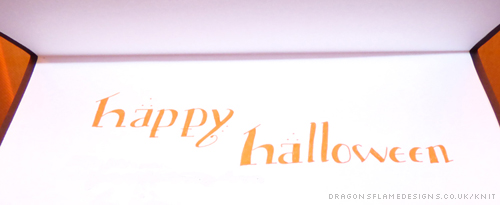
Inside the card – copying a Hobbit font

But for the inside, I wanted to use an orange gel pen…. so I cut some white paper to line the card, and copied a Hobbit-themed font from my computer screen to make it look a little more unique!

I knew I wanted to send a gift with the card, and I’d found the bat pattern from BeeZee Art a little while ago. I made the mistake of buying some nice thick fleece to make the bat…. and ended up having to hand crank the sewing machine, as even with a denim needle, it struggled with the thickness of the fabric layers!

I’m pleased with how the bat came out though – although the black fleece was a nightmare to work with, it gives Batty a nice plush feel, and the orange lining for his ears and wings (remnants from the polycotton lining of the Trendy bag‘s second version) lifts the black.

Bat - wings open  Bat - folded wings

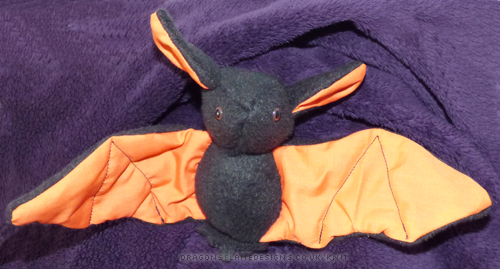
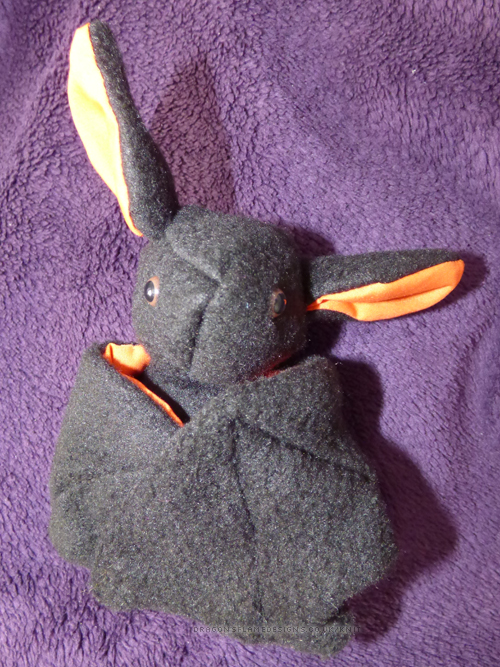
My topstitching on the wings came out surprisingly well, even though his nose is slightly crooked! But his new owner loved him, and that’s the whole point 😀

A Lush little bag….

When I go shopping for some bath products, I don’t want to just have them in my main bag – they’d make everything smell! I love the look of the new Butter Bear Canvas Bag from Lush but at £9.95, I decided that I was better off making a bag of my own – then I can almost guarantee nobody will have one quite like mine!

So, using some of the Jungle Book fabric I used for the messenger bag, and also some of the same cotton for the lining, I made up a Fat Quarter Bag using Amy’s pattern. I did change the dimensions a little, to work around the fabric pattern, and I also added in a French seam on the base (otherwise the back would be upside-down!

bag-front

Once I added in the gusset in the base, the bag ended up a perfect size to carry a pot of Dream Cream, one bubble bar and two Butterbears!

bag-back

And the best thing about it? It didn’t cost much for the fabric, as it uses just over a fat eighth of each, and it’s completely washable just in case anything spills in it!

Handy clothes peg bag – tutorial

Having seen the condition of my Mum’s clothes peg bag, I decided it was time she had a new one. Being the kind soul that I am, I thought I would share this clothes peg bag tutorial with you for free. 🙂

Materials

One  wooden clothes hanger (this is a children’s hanger, approx 33cm (13″) from side to side) if your clothes hanger is wider than this, simply increase the width of the fabric to suit (make sure add in a 5/8″ / 1.5cm seam allowance on both sides when working out the width).
Outer fabric – two pieces 36cm wide x 41cm high
Lining fabric – two pieces 36cm wide x 41cm high
Matching thread


Seam allowances are 5/8″ (1.5cm) unless otherwise stated. Tacking is done 1/2″ (1.2cm) from the edge.

Preparing the Fabric

Supplies

  1. Take the piece of fabric you want to use for the back of the clothes peg bag, and tack (baste) it to one of the lining pieces, wrong sides together. This will stop it moving around as you sew the pieces later.
  2. Take the piece of fabric you want to use for the front, and tack that to the other lining piece, right sides together.

Marking and Making the Opening

      1. Draw the opening onto the fabric using chalk / something that won’t show through to the other side (I cheated and used a pencil) I centred my opening, making it 8 cm from the top seam, 15cm from the bottom seam. That gave me an opening 15cm high, and I made it 13cm wide.

        Measurements

        Just in case those instructions make no sense, here’s a diagram showing the measurements I used

      2. Carefully stitch over the marked opening, using a short straight stitch.
        Opening - stitched

        I stitched the opening in black to make it easier to see where I needed to cut the hole

        You’ll probably notice that my opening isn’t totally even both sides – that’s not a problem, as it’s not overly noticeable when it’s finished!

      3. Carefully cut out the opening, staying within the stitching, and clip the curves so it is easier to turn (make sure to not clip the stitches!).
        Clipped Curves
      4. Carefully unpick the tacking stitches around the outside edges.
      5. Turn the front pieces through the opening you’ve just cut, and press flat.Turned and pressed
      6. If like me you chose to use a non-matching thread up to this point, change the thread to a more suitable colour, then top stitch the opening…. I used the side of my presser foot as a guide for a nice narrow seam allowance.Top Stitch

Putting the Bag Together

  1. Take the front piece (with the opening), and the back piece (back main fabric and lining still tacked together), and place them right sides together. Pin around the outside, but mark a small space at the top for the metal hook of the clothes hanger to poke through.
    Important: This bag will have a straight top edge – for a small hanger, it isn’t really necessary to make a slope to the top, but if you’re using a larger hanger, you might want to draw the right slope onto the lining fabric so you know the exact line to follow on the next step.
  2. Starting just on the side of the opening (marked with a * on the image below), stitch down a little, then sew the 5/8″ seams around the bag. When you get to the other side of the opening, turn and stitch off the edge again, so you have two small lines either side of where the hanger will fit through.

    I’ve gone over the seams on the computer so you can see where the stitching is (the thread blends in a little too well on the lining!)

  3. Trim the seam allowance down a little (just to stop it being so bulky).
  4. For extra reinforcement, I stitched around the seams again, 1/2″ from the newly trimmed down edge (yes, this does make the bag a little smaller). This time however, I started below the opening, just backstitching on both sides to reinforce it.
  5. Turn through the opening, and press
  6. Fit the hanger into the bag, carefully slotting the hook through the gap at the top

And there you have a finished clothes peg bag, ready to fill with pegs!finished-front front-detail finished-back

I’d love to see the peg bags you make with this tutorial – simply post links to the pics in the comments 🙂

Main and lining fabric from Fashion Fabrics.


This tutorial is provided free for everyone to use. Link backs to this tutorial are welcome – please do not copy the tutorial and post it on your own site!

You may sell items you have made from this pattern, but please do not sell the pattern itself! 


K’s New Jacket

A couple of months ago, I knitted a jacket for a friend’s baby boy, K; but he grew out of it much faster than I’d allowed for! K’s Mum asked if I could make a larger jacket that would work for the winter. Trouble is, the pattern I used only goes up to 3-6 months, and she was looking for 9-12 months….

I had a rummage through Ravelry, and came across the Simple Hooded Cardigan by Lion Brand Yarn. It looked pretty similar to the Wee Speedy knit I’d made originally, and with chunky yarn I had a feeling that it wouldn’t be a nightmare to knit.

K's Jacket

The main body is knitted in stocking stitch, with a garter stitch edge to the base and front edges. The sleeves were an experience to try picking up the stitches for – I’m sure I didn’t get them quite as balanced as they were meant to be, but hopefully the sleeves are nice and comfortable.

K's Jacket

The buttonhole was pretty easy, just being a yarn over – I was able to use a couple of buttons from my Mum’s button stash, which catch the light really nicely, but also compliment the blue in the yarn.

K's Jacket

I purposefully chose a variegated yarn, as I wanted to have some additional interest in there (and the original one was knitted with one strand of white and one strand of blue, so I was looking for something similar). This was Marriner Mermaid Chunky in blue random – only £1.50 a ball and fully washable, which is essential!

K's Jacket

Hopefully we’ll get some nice chilly weather in autumn and winter, so K can wear his new jacket a lot of times before he grows out of this one too! 😉

Another jacket – blazer

I was browsing through some blogs the other week when I came across Melly Sews and their fantastic free blazer pattern. With the words “free” and “jacket”, it wasn’t something I was going to pass up on, so I printed the pattern and started cutting & sticking the paper together.

It’s only a one-size pattern, which unfortunately for me is too tight across the back and the arms. However, undeterred by that, I set about adding an extra inch on the back panel and side seams.

The pattern calls for patch pockets, but there’s something about patch pockets that never look right to me – maybe it’s my poor quality top stitching, but they never seem to fit the look of a smart jacket. So I followed the instructions for welt pockets instead:

Welt Pockets

They aren’t perfect, they’re pretty shallow, but they’re usable and that’s what counts!

I needed to make a lining, and I didn’t want to use the same fabric to line it with, so I bought some plain blue polycotton to balance out the patterned polycotton on the outside,

Blazer

I think this jacket looks quite similar to the CC one I spotted earlier in the year, with the back vent and notched collar. Ok, my top collar is actually round the wrong way – the lining fabric should be on the inside not the outside, but that adds some individuality to the jacket I think,

And the best part of this jacket? The only hems are on the sleeve cuffs – the lining is sewn to the main fabric around the base then turned round the right way, so there’s no massive hem at the base to sew up! 😀